About

Friday, March 29, 2024

Easter Greetings

 Hello,

I thought I finished making all my Easter cards when I realized I needed one more. I saw this design on Pinterest and put my own spin on it.


The birds were fussy cut from the Flight and Airy DSP. I nestled them in some die cut flowers. 


The inside sentiment is from the Easter Friends stamp set. 


I hope you enjoy this Easter weekend. Blessings to you.

Thanks for stopping by. Until next time....


Paula


Friday, March 15, 2024

Latte Love

 Hello,

Back with a new stamp set. Latte Love. For coffee drinkers, this is a fun set. The suite of products includes a stamp set, dies, designer series paper and embellishments. Of course each product can also be purchased separately, but I think you'll want to have it all.🤎


Check out the coffee press die, adorable!


This set is so versatile. It's perfect for masculine birthday cards, thank you cards and of course invitations. 

Today's card also features a fun fold. 


Don't you just love the coffee sploches? 


To make the fun fold....

Cut a piece of card stock measuring 11" x 4-1/4" and score at 2-3/4" and 5-1/2". Fold the score lines so it creates a "Z" shape. Burnish well.


To decorate....

Cut 2 pieces of dsp measuring 2-1/2" x 4" for the front and another coordinating piece of dsp measuring 4" x 5-1/4" for the inside. 

To decorate the front, any shape can be used for the sentiment or stamped image. I chose to use the Radiating Stitches dies. I fussy cut the cups from the dsp. When adding a piece of card stock to the inside for a personal note, make sure it is the same size as the piece cut for the front so that it doesn't show when the card is closed. 


Here are a couple of other cards I made using the Latte Love Suite.

Coffee rings..adorable.


Thanks for stopping by. Until next time....

Paula


Thursday, March 7, 2024

Column Fun Fold

 Hello,

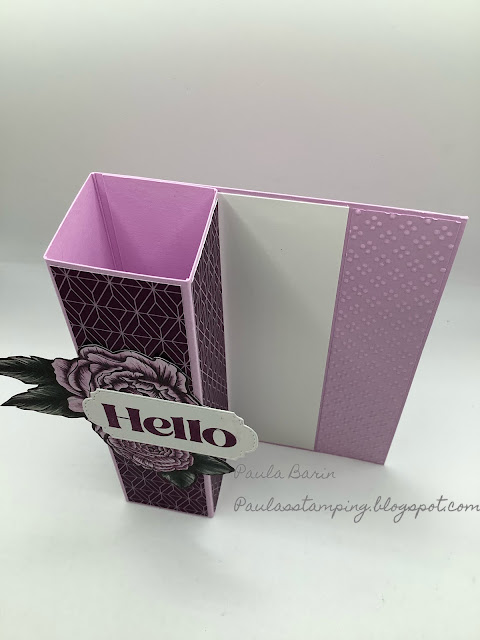
I've got an easy fun fold for you today. It's called a column fold. This card folds flat and fits into a medium envelope. 

Here it is folded flat.


And when opened...

Here's a top view...


Here's how I made it: (all measurements are in inches)
Take a piece of card stock measuring 5-1/2 x 10-1/8 and score at 4-1/4, 5-3/4, 7-1/4 and 8-3/4.
  Burnish all score lines to get a nice crisp fold. 
( the white card stock measurement should be 1-5/8 x 5-3/8)

Fold the card base around so that the 8-3/4 score line is sitting flush with the back of the card base. 

It's at this point I make sure the card opens and closes easily. Then I adhere the piece to the back of the card.
(shown here with a paper clip)

And that's the fun fold. 
Now to decorate.
DSP: cut 3 @ 1-3/8 x 5-3/8 and one piece at 1-1/8 x 5-2/8
Cut a piece of white card stock for the inside measuring 1-5/8 x 5-3/8.

Extra pieces of card stock is required for your stamped image or sentiment. 
*Note: if you require more space to write a personal note, a piece of white card stock can be added to the back of the card measuring 4 x 5-1/4.
The 3 dsp pieces are adhered to the first three scored panels. The single piece of dsp is adhered to the back of the base. The white piece of card stock is adhered beside the dsp panel on the back base of the card.                         ðŸ Ÿ                       ðŸ Ÿ

For this card I used Fresh Freesia and Basic White card stock, Favored Flowers Designer Series Paper and the Fragrant Flowers Bundle.

This fun fold is definitely a keeper. So easy especially when making multiple cards. (Although, don't be like me and get too confident thinking you can make it without checking the measurements from time to time🤣. The second card I made didn't go so well)


Thanks for stopping by. Until next time....

Paula


Sunday, March 3, 2024

Anniversary card

 Hello,

Back with a non floral card today. 

Love you more than coffee! I think this would make a perfect anniversary card. Unforutnately I do not have a 'Happy Anniversary" stamp. Of all the stamp sets I have, this is one I don't. I'll find one by the time my anniversary comes around in July.

This card is a fun fold. 


One of the easiest fun folds to make.


Perfect for any occasion and any image.

Recipe:

Very Vanilla card stock measuring 4-1/4" x 11", scored at 2-1/8" and 5-1/2".

Very Vanilla card stock measuring 3-7/8" x 2-7/8", cut 2

Early Espresso card stock layer for front panel measuring 4-1/8 x 5-3/8"

Early Espresso card stock for image layer measuring 4" x 3"

Early Espresso card stock for inside layer measuring 4-1/8 x 5-3/8

DSP for front panel measuring 4" x 5-1/8"

DSP for inside of card measuring 4" x 5-1/8"

Card stock- Stampin UP

Image. sentiment and die cuts- Mango Crafts

Give this basic fun fold a try. For a varied look, try using another shape for the image layer or adhereing the layer in landscape. Your card will take on a different look every time!

Thanks for stopping by. Until next time...


Paula

Saturday, March 2, 2024

Marigold Moments

 Hello,

Today's card has a spring vibe. It's no secret that I love flowers so most of my stamp sets are florals or some kind of foliage. Flowers are nature's beauty and it always amazes me how each petal forms to make a flower. 

This card says spring to me. I used the Marigold Moments bundle to create a flower that matches the designer series paper, Symbols of Fortune.


The card measures 5-1/2 x 4-1/4. 


To add a bit of interest, I chose the Everyday Detail Dies as a matte for the flower. 


Mixing and matching your stamps, dies and dsp extends the use of your supplies. 


Thanks for stopping by. Until next time....


Paula