About

Tuesday, December 26, 2023

Merry Christmas....a little late

 Hello stamping friends,

I blinked and most of December disappeared. With Christmas prep, entertaining, baking, wrapping... well, you get the picture, I have been remiss in wishing you a Merry Christmas. I hope your holiday festivities were grand. 

Today is Boxing Day, a day to relax from the flurry of Christmas activities. Maybe even make a card.

Today I'm posting some of the cards I have made over the past couple of weeks. I hope you like them.


Thanks for stopping by. Take time to relax if you can. Until next time…

Paula


Monday, December 11, 2023

Coffee Time

 Hello,

Are you ready for Christmas? I'm finished everything except for the food. 🙌

I've just about used up all my ideas for Christmas cards so today I'm going in a different direction.

Coffee...morning juice...energy booster...after dinner drink with a treat. 

I love this sentiment...Good days start with coffee and you!


Thanks for stopping by. Until next time...


Paula


Sunday, November 5, 2023

Kindest Gnomes

 Hello,

It's been a while. I've survived a kitchen reno. All my energy and focus was on getting the kitchen back to normal. I have to say, the next time a reno happens in my house, I'm moving to a hotel! 

The stress level is gradually coming down so I was able to get in to my craft room. 

Today I made this card.


I used the Kindest Gnomes bundle. The gnomes are kind of generic so can be used for any occasion. 


I'm well on my way to making Christmas cards. I won't be caught off guard at the last minute. 


Thanks for stopping by. Until next time...

Paula 

Wednesday, October 18, 2023

Floating Card

 Hello crafters,

I saw this floating card idea on Pinterest. 


The card base measures 4-1/4” x 5-1/2”. Adhere  a piece of coloured card stock, for this card I used Shaded Spruce, to the card base. Cut a piece of acetate to measure the same as the card base.  Cut strips of white card stock about 3/4" wide. I made the length long to hang off the edge of the acetate and cut to the width of the card after all the strips were adhered. Glue the strips to the acetate so that they are evenly spaced within the 5-1/2” acetate. Trim the strips. Add dimensionals to the back of the acetate behind the white strips so that they are not seen from the front of the card. Adhere to the base.


Thanks for stopping by. Until next time…

Paula


Saturday, October 14, 2023

Vintage Sled

 Hello,

Today’s card took me a while to make. There are lots of fiddly bits to this die set from Tim Holtz/Sizzix called Vintage Sled. 


All the card stock is from Stampin’Up.  The background dies are one of my favourites called Color and Contour. The snowflake die I’ve had forever, one by Cuttlebug


I love the snow detail. It’s called Grit Paste by Ranger. It stays white when it dries. 
This card will be a one off unless I can muster the energy to make another one.  See those little rivets in the sled? They are die cuts. Next time I’ll colour the rivets with a marker. Easy peasy. 

Thanks for stopping by. Until next time…

Paula


Friday, October 6, 2023

Thanksgiving Card

 Hello,

Today's card was a simple one to make. 


The leaves are from Tim Holtz as is the embossing folder. First, I blended some ink in autumn colours on white card stock. Then I cut the leaves out using the dies. I embossed the background for some texture then adhered the leaves. The sentiment comes from Stampin' Up's Country Home. 

I wish all my fellow Canadian stampers and friends a very Happy Thanksgiving. Enjoy your long weekend.

🦃

Thanks for stopping by. Until next time...


Paula

Wednesday, September 27, 2023

Tea Light Candle Box

 Hello stamping friends,

Whoa! Its been while since I've posted. So many of life's events get in the way of crafting and posting. 

But, I'm back today with a sweet little gift box. This tea light candle box makes a great gift for teachers, hostess gifts, giveaways, craft sales or for random acts of kindness. The box measures 6"x 1-1/2" x 3/4". The box may even fit a few candy canes although I don't have any on hand to try them out.


So here we go for the how to.

Begin with a piece of card stock. Now I've seen some made with DSP but I don't find them to be sturdy enough. Cut your card stock to measure 7-3/4" by 5-1/4". Score on the 7-3/4" side at 3/4" and 7". Rotate so the short side is along the top of your score board and score at 3/4", 2-1/4", 3' and 4-1/2". It should look like this.
Next, cut a piece of DSP to measure 1-1/4" x 6" and while the card stock is in landscape position, adhere the DSP top the second section from the bottom as shown in the photo below.  Use a die or window punch to cut out a shape through the card stock and DSP ( this step can be omitted if you don't want a window).  Next, with a circle punch or die, partially cut a half circle for a notch in the section below the DSP section.


Next, cut the tabs for the corners as below. Mitre cutting the tabs will ensure the corners go together easily.


Adhere the tabs to the box to form the corners, making sure to adhere the bottom of the box first. Then adhere the top tabs to form the corners. It's easy to adjust if needed to fit to the bottom of the box.  I used Stampin' Seal+  as my choice of adhesive. I found glue to be too messy. But if you're a whiz with glue, go ahead and use it. Note: I find tear and tape not strong enough to hold the box together. But that's just me.


Fill the box with 4 tea lights and decorate as desired. Note: These tea lights are from a dollar store and fit easily in the box. I also used some tea lights from Ikea which fit very snuggly in the box making the box pucker a little.


And there you have it. These boxes are so easy to make and assemble quickly if making multiples (I've made so many, I could do it in my sleep 😄). It's also a great way to use up some off cut DSP.
I hope you give it a try.

Thanks for stopping by. Until next time...

Paula

Sunday, September 3, 2023

Gift of Giving

 Hello,

I've started my Christmas cards for this year. One of my new favourite stamp sets is Gift of Giving. 

It can be found in the new September-December 2023 Mini Catalogue, available September 6th to customers. I purchased it for the mug image alone....its so cute.


For my card today:
Card stock: Pretty Peacock, Old Olive, Basic White
Stamp Set: Gift of Giving
Die cut: Christmas Layers (R) for the foliage and Layering Circles (R) for the image
Embellishments: Enamel Effects
Stampin' Up Blends: Bronze, Ivory, Pretty Peacock, Old Olive, Sweet Sorbet
Embossing Folder: Cable Knit (R)

Thanks for stopping by. Until next time....

Paula


Monday, August 21, 2023

Fun Fold Flap

 Hello,

I think many of us struggle with making masculine cards. I like to keep it simple when making a card for a man....no embellishments, bows or ribbons. So, how to make it interesting? Make a fun fold. 

This fun fold is simple, letting the DSP do the work..

All measurements are in inches.

Here is an alternate card.

The card base measures 5-1/2 x 8-1/2, scored at 4-1/4. 


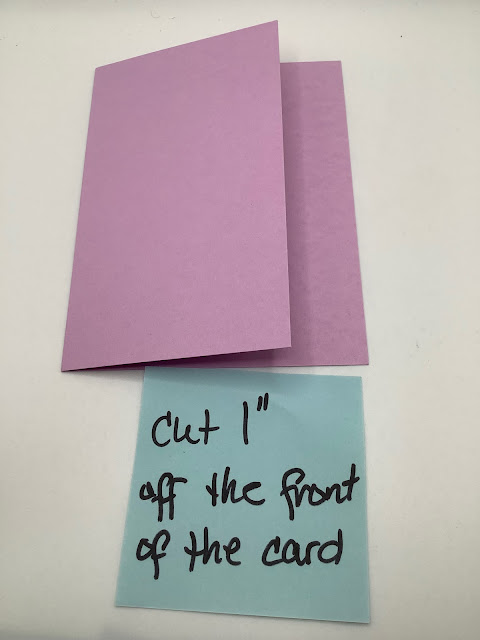
Next, cut 1" off the front of the card. Initially I cut 2-1/8 off and found that was too much. 


Next, with the same colour card stock as the base, cut an elongated shape, such as a nested die or rectangle.  I tried squares and circles but those shapes were not big enough. For the fish card above I chose a flag type die. For this card I used the Stitched Nested Label Dies. 

Score the shape at about 1/4". The shape will dictate where you score.
Next, adhere the shape to the inside back of the card.
Add the inside Basic White for a sentiment (stamp it before adhering) or personal note.

Now add a sentiment which will hide under the flap. This is optional. You can add your sentiment to the inside of the card.


For the last part, add the Basic White layer to the flap with your chosen image.
 (Those embellishments may not be adhered in the proper place, they were giving me a hard time 😡)


Alternatively, a sentiment can be added to the front. And that's it! 

I hope you give this simple fun fold a try. Thanks for stopping by.
Until next time....

Paula

Stampin'Up Supplies:
Card stock: Fresh Freesia, Basic White
Blends: Fresh Freesia, Pale Papaya, Bronze
DSP: Dandy Designs
Image and Sentiment: Circle of Sayings
Dies: Stitched Labels Dies, Oval Die


Saturday, August 12, 2023

Advent Calendar

 Hello,

A fun project for you today. An Advent calendar. I figured I'd better start it now instead of leaving it closer to Christmas. That way I know it's done and there is no rushing to make it. 

First let me say, the design comes from Emma Goddard at Blog - Coastal Crafter. You can see the instructions for the boxes here.

Once I started making these boxes I couldn't stop. They were easy to assemble and a great way to use up pieces of DSP.


I think each box will fit 2 Lindt balls or small candy cane. Notes or poems could also be included. The outside box measures 2 5/8" x 1 11/16".


The inside box fits snuggly into the outside box so, as long as the contents aren't  too heavy, it won't slide out. 

This calendar could be used for any count down event. The boxes would make a lovely display on a Christmas tree. 

Hope you give it a try. Thanks for stopping by. Until next time...

Paula


Saturday, July 29, 2023

Side Step Fun Fold

 Hello,

Rainy day here, perfect to stay home and stamp.

Today's card is a fun fold....a side step card. 


Simple to make. 


For this card I used the Masterfully Made Designer Series Paper. The colours in this set of papers are beautiful, from bold to soft.

Here are the measurements. 


Add your sentiment as desired. I hope you give this card a try. 

Thanks for stopping by. Until next time....


Paula


Friday, July 21, 2023

A Few Cards

 Hello,

Just wanting to share a few cards I’ve made over the past few days. 

First up, a book  fold card. An easy fun fold and a good way to use up scraps of dsp.


Next, another fun fold. A tri-fold card. 

For this card I used Peony Garden  DSP.


Another version using Countryside Inn DSP.


The measurements for this tri-fold are: 
Base: 5 1/2 x 11 scored at 1 3/4, 5 1/2 and 9 3/4. The belly and measures 1 1/4 x 9 1/2. 

I hope you give these fun-folds a try. 
Thanks for stopping by. Until next time….

Paula


Sunday, July 9, 2023

Matchbox Fun Fold

 Hello,

Today I have a cute fun fold for any occasion. It's called a matchbox fun fold. 


The bottom flap of the card folds up and tucks under the rim at the top. How cute is that?
And inside... surprise! its a pop up.

Wouldn't this fun fold be cute for a children's party invitation? Or a BBQ invitation? Even a birthday card. The possibilities are endless!

Here's how it goes together. All measurements are in inches. Cut your pieces as per the photo below. You may need an extra piece of scrap paper, the size depends on the image inside, to attach your image to the pop up mechanism.

For the base, the longest scored piece is the back and the shortest scored piece is the front flap. Burnish all score lines well. Adhere the dsp to the front of the card and to the front part of the top tab. Adhere the base under the top tab piece. 

For the pop up insert, cut a piece of card stock measuring 9 1/4 x 3 1/2, scoring at 5. Fold and burnish. With the folded part of the insert at the top of your trimmer, cut 3/4" down at  the 1 1/2" and 2" mark. That's the pop up mechanism. 
(excuse the crude drawing)

If you want to do any stamping on the insert, do it before you adhere to the base. Match the score lines of the insert to the base and adhere both the top and bottom, ensuring the longest part is at the top. Then adhere the image to the pop up mechanism. If the image is large, adhere it to a piece of card stock for stability, then to the pop up mechanism. 

Tuck the bottom flap under the top rim. Tie a ribbon around the top rim to hold the card closed. Alternatively, you can add a small magnet or velcro fastener to hold the card closed. 

I hope the instructions are clear, please reach out if you require further clarification. (Sorry, I'm not the best teacher 😟). 

I hope you give this card a try. Until next time....

Paula