About

Showing posts with label fun fold cards. Show all posts

Monday, August 21, 2023

Fun Fold Flap

 Hello,

I think many of us struggle with making masculine cards. I like to keep it simple when making a card for a man....no embellishments, bows or ribbons. So, how to make it interesting? Make a fun fold. 

This fun fold is simple, letting the DSP do the work..

All measurements are in inches.

Here is an alternate card.

The card base measures 5-1/2 x 8-1/2, scored at 4-1/4. 


Next, cut 1" off the front of the card. Initially I cut 2-1/8 off and found that was too much. 


Next, with the same colour card stock as the base, cut an elongated shape, such as a nested die or rectangle.  I tried squares and circles but those shapes were not big enough. For the fish card above I chose a flag type die. For this card I used the Stitched Nested Label Dies. 

Score the shape at about 1/4". The shape will dictate where you score.
Next, adhere the shape to the inside back of the card.
Add the inside Basic White for a sentiment (stamp it before adhering) or personal note.

Now add a sentiment which will hide under the flap. This is optional. You can add your sentiment to the inside of the card.


For the last part, add the Basic White layer to the flap with your chosen image.
 (Those embellishments may not be adhered in the proper place, they were giving me a hard time 😡)


Alternatively, a sentiment can be added to the front. And that's it! 

I hope you give this simple fun fold a try. Thanks for stopping by.
Until next time....

Paula

Stampin'Up Supplies:
Card stock: Fresh Freesia, Basic White
Blends: Fresh Freesia, Pale Papaya, Bronze
DSP: Dandy Designs
Image and Sentiment: Circle of Sayings
Dies: Stitched Labels Dies, Oval Die


Friday, July 21, 2023

A Few Cards

 Hello,

Just wanting to share a few cards I’ve made over the past few days. 

First up, a book  fold card. An easy fun fold and a good way to use up scraps of dsp.


Next, another fun fold. A tri-fold card. 

For this card I used Peony Garden  DSP.


Another version using Countryside Inn DSP.


The measurements for this tri-fold are: 
Base: 5 1/2 x 11 scored at 1 3/4, 5 1/2 and 9 3/4. The belly and measures 1 1/4 x 9 1/2. 

I hope you give these fun-folds a try. 
Thanks for stopping by. Until next time….

Paula


Sunday, July 9, 2023

Matchbox Fun Fold

 Hello,

Today I have a cute fun fold for any occasion. It's called a matchbox fun fold. 


The bottom flap of the card folds up and tucks under the rim at the top. How cute is that?
And inside... surprise! its a pop up.

Wouldn't this fun fold be cute for a children's party invitation? Or a BBQ invitation? Even a birthday card. The possibilities are endless!

Here's how it goes together. All measurements are in inches. Cut your pieces as per the photo below. You may need an extra piece of scrap paper, the size depends on the image inside, to attach your image to the pop up mechanism.

For the base, the longest scored piece is the back and the shortest scored piece is the front flap. Burnish all score lines well. Adhere the dsp to the front of the card and to the front part of the top tab. Adhere the base under the top tab piece. 

For the pop up insert, cut a piece of card stock measuring 9 1/4 x 3 1/2, scoring at 5. Fold and burnish. With the folded part of the insert at the top of your trimmer, cut 3/4" down at  the 1 1/2" and 2" mark. That's the pop up mechanism. 
(excuse the crude drawing)

If you want to do any stamping on the insert, do it before you adhere to the base. Match the score lines of the insert to the base and adhere both the top and bottom, ensuring the longest part is at the top. Then adhere the image to the pop up mechanism. If the image is large, adhere it to a piece of card stock for stability, then to the pop up mechanism. 

Tuck the bottom flap under the top rim. Tie a ribbon around the top rim to hold the card closed. Alternatively, you can add a small magnet or velcro fastener to hold the card closed. 

I hope the instructions are clear, please reach out if you require further clarification. (Sorry, I'm not the best teacher 😟). 

I hope you give this card a try. Until next time....

Paula


Tuesday, July 4, 2023

Sweet Ice Cream

 Hello,

It's going to be stinkin' hot here for the next few days. A good time to stay indoors and craft where it's cool. 

What better way to cope with the heat, other than AC of course, than to treat ourselves with some nice cold ice cream. What's your favourite flavor? I love butterscotch.

The Sweet Ice Cream suite is one of those where the DSP does all the work. 

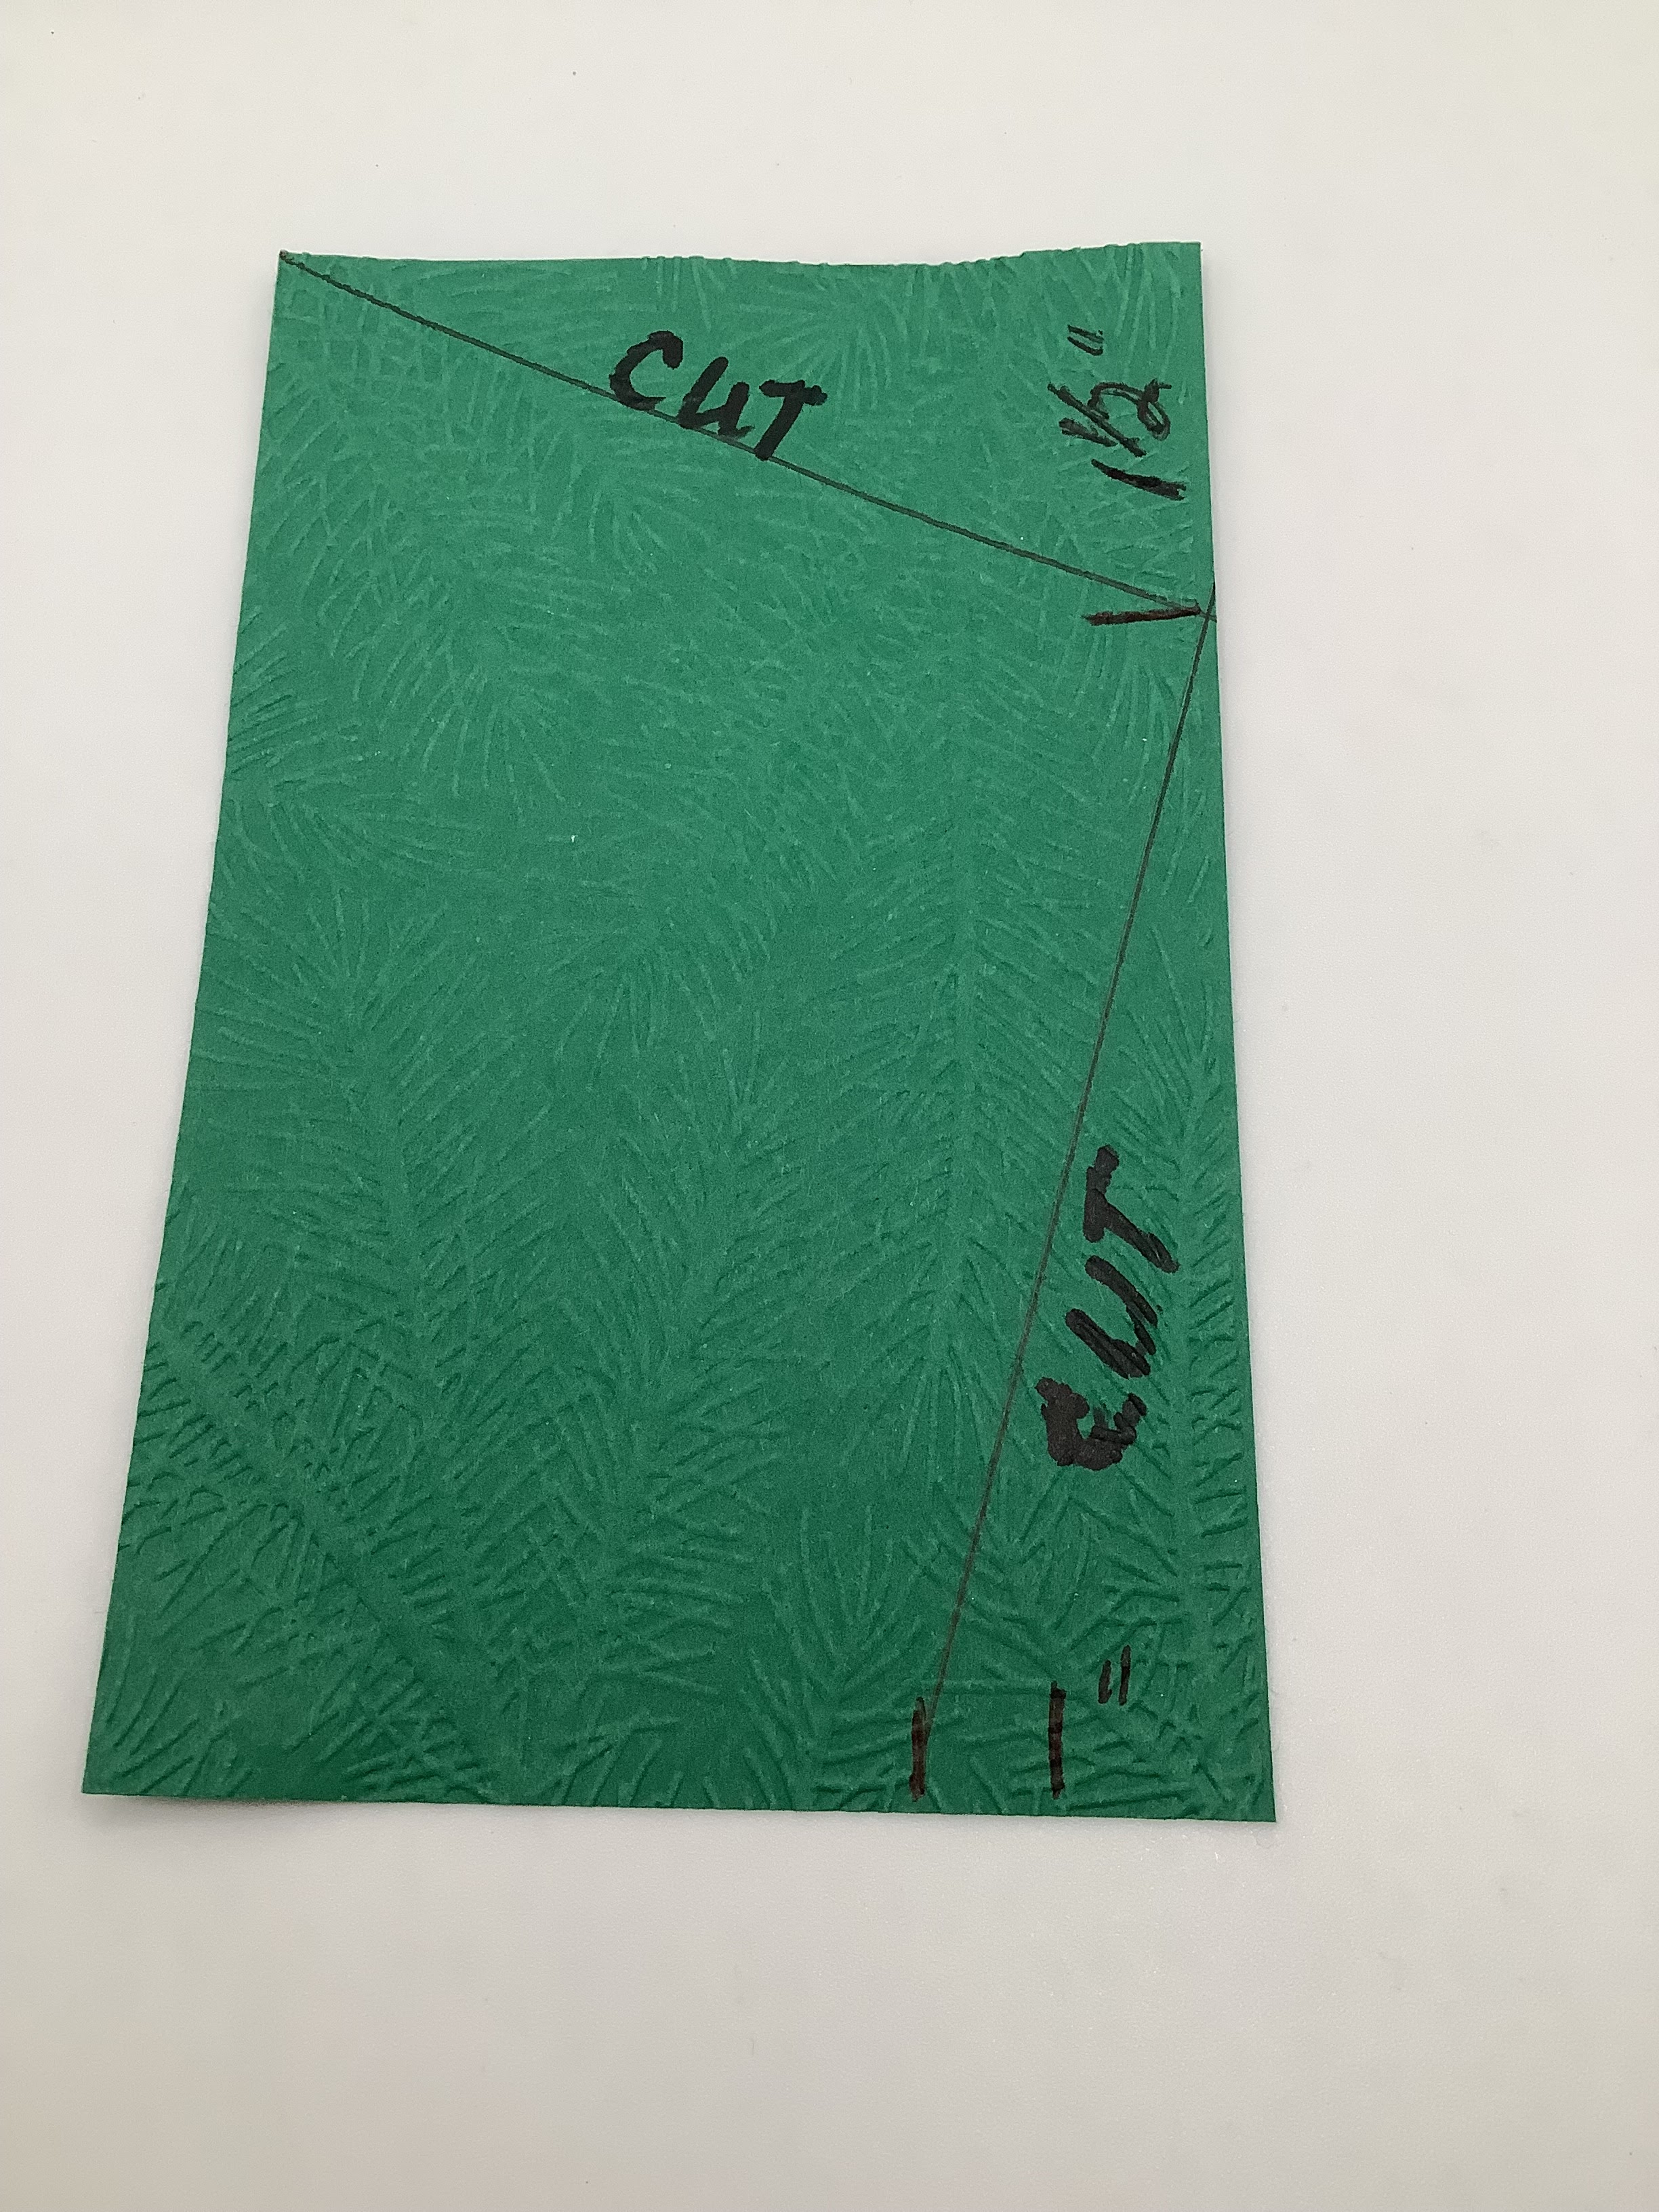
This was an easy fun fold. To make the angle cuts, measure down from the top right corner  1 1/2" and make a tick mark. Then measure 1" in  from the bottom right corner. Cut from the top left to the 1 1/2" tick mark then cut from the 1 1/2" tick mark to the 1" tick mark at the bottom. To cut the DSP, measure 1/4" smaller than the card stock then use the same method to cut the angles on the DSP. 

Like so...
Then decorate as required.

For this card...
I used the same DSP pack, but cut 2 1/8" off the front of the card, then attached a panel which could be any size  or any shape you like. I can see this DSP used for any occasion...birthday....party invitations, even get well.

I hope you give the designs a try.

Thanks for stopping by. Until next time....

Paula


Tuesday, June 20, 2023

Everything is Peachy

 Hello,

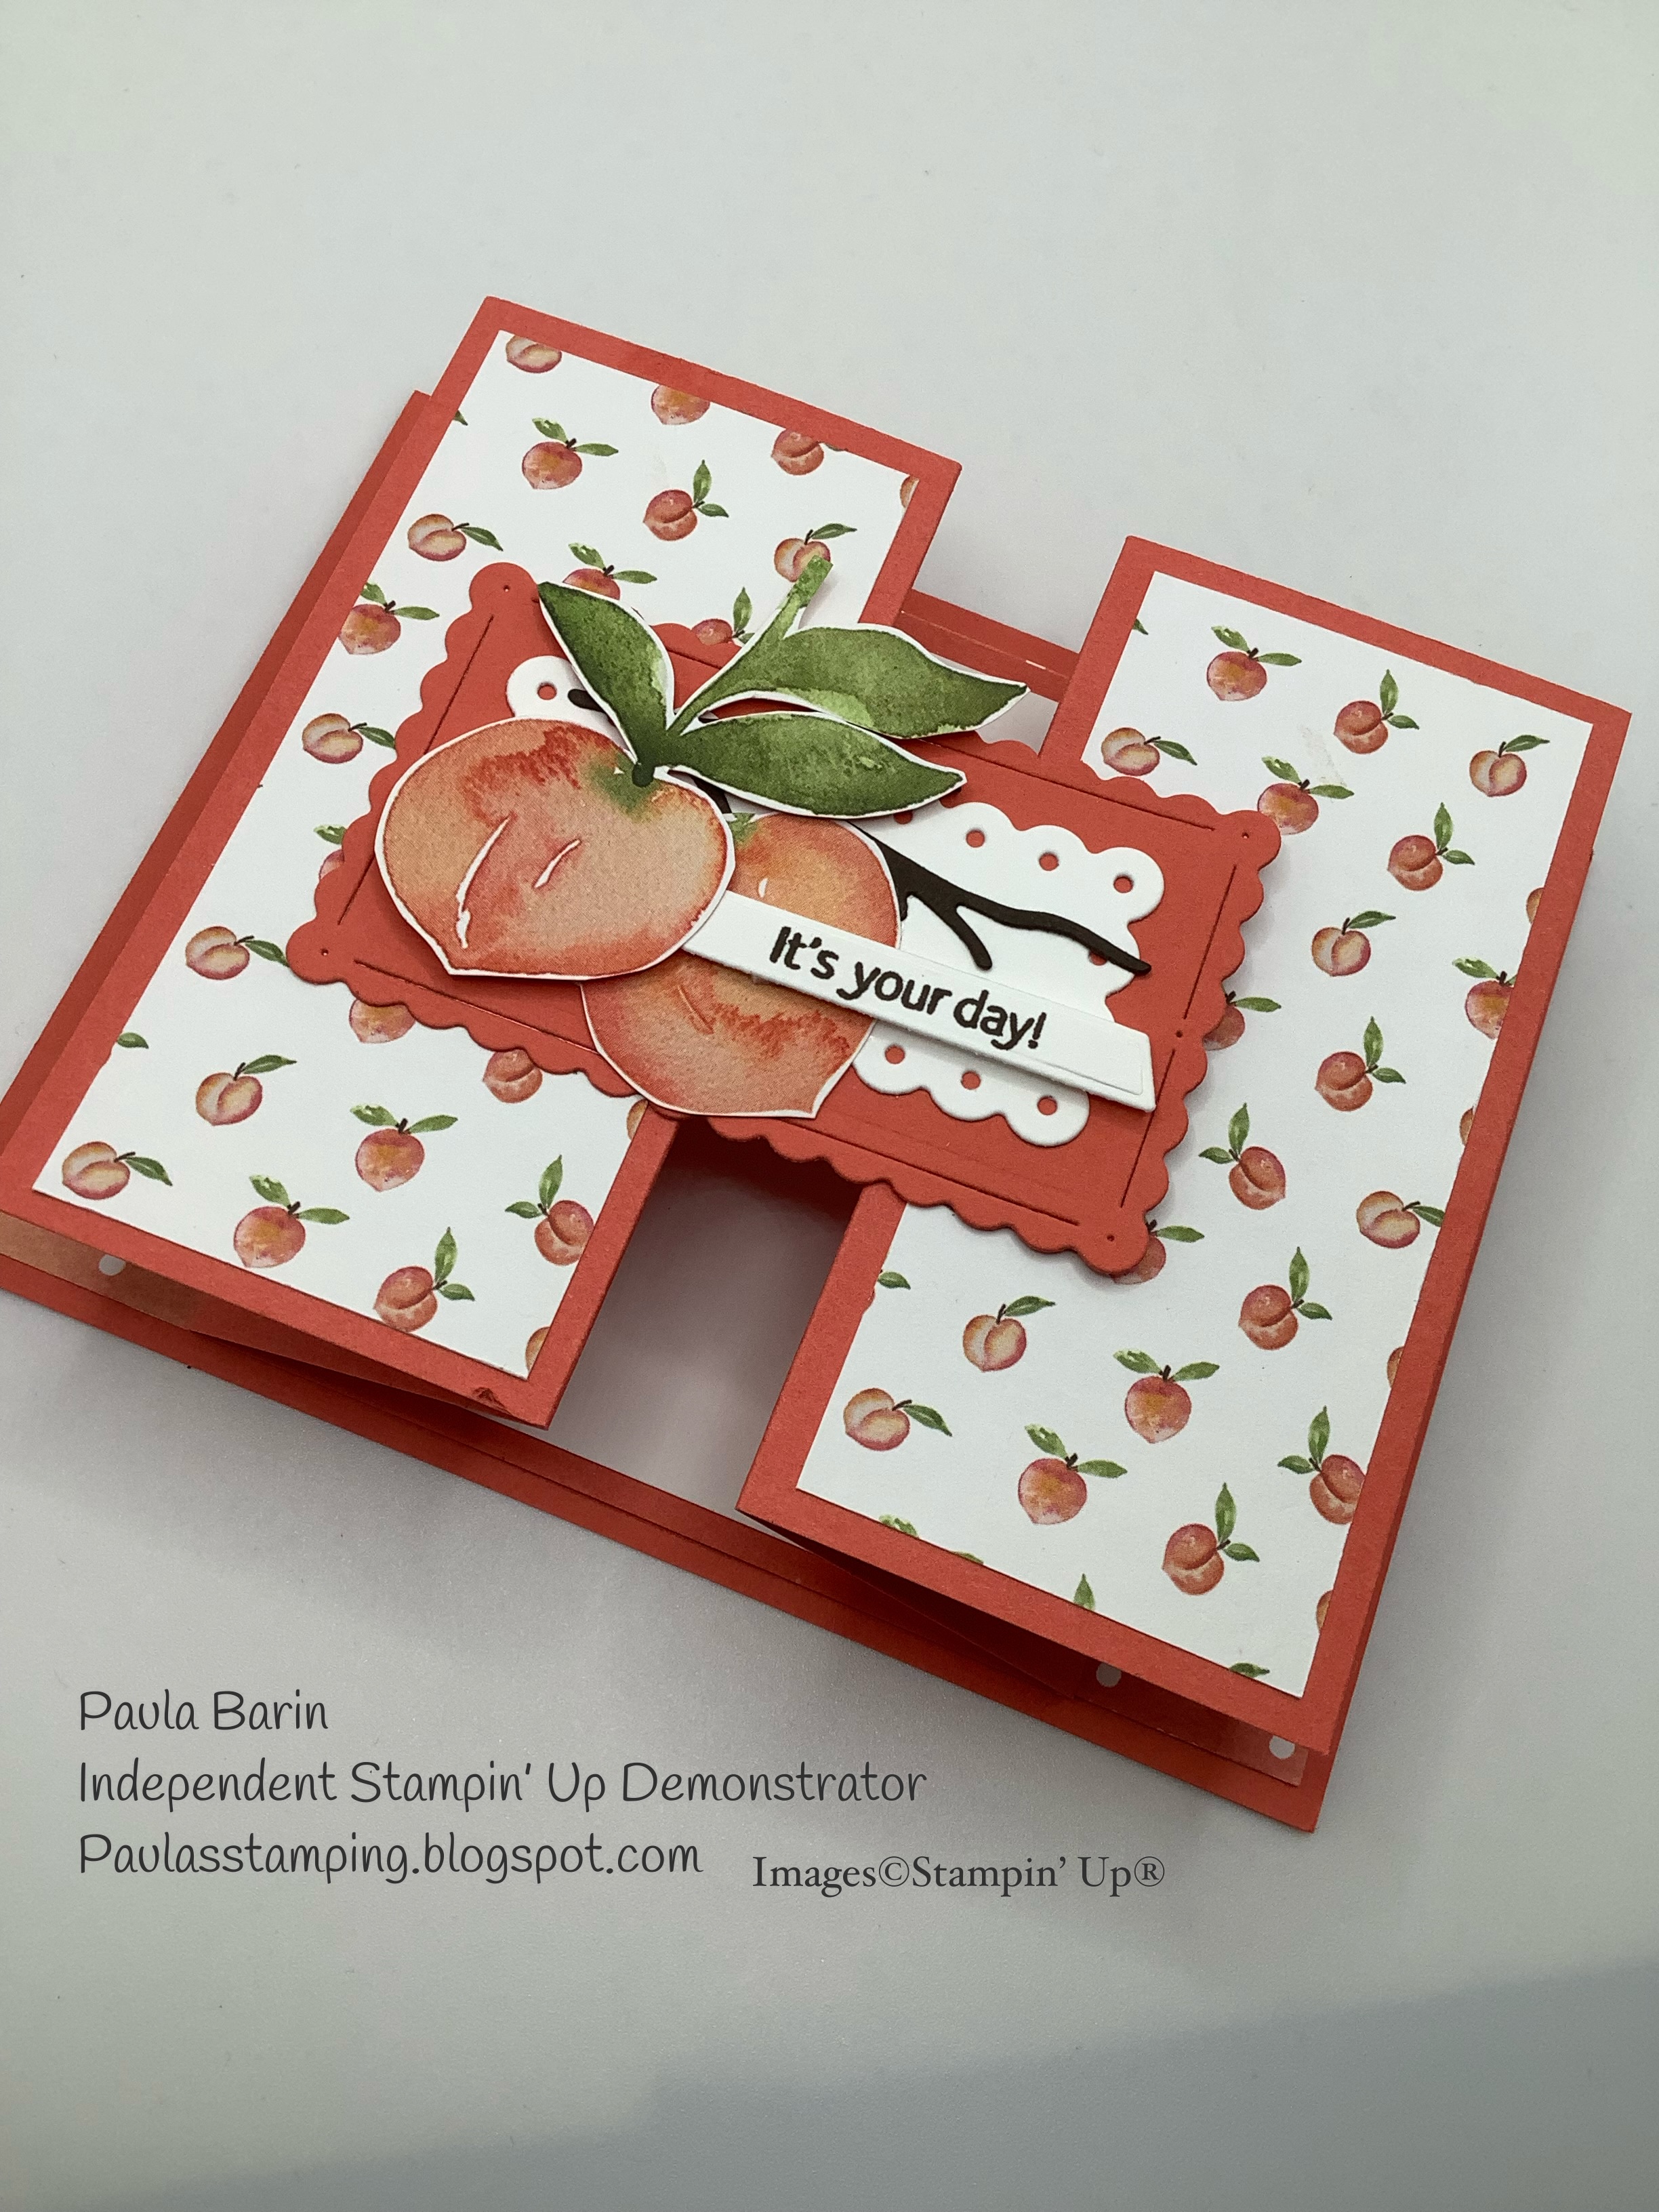
Here's a peachy fun fold today. 


Here's how I made it.
The base measures 4 1/4 x 5 1/2.  The zig zag layer measures 4 x 11 and the top layer measures 3 1/2 x 3 1/2. For my card, any of the dsp layers measure 1/4" smaller.
 Now for the assembly.
  1. Add the coordinating DSP to the layer, this will measure 4 x 5 1/4. Adhere to the base. 
  2. Next, score the 4 x 11 piece of card stock at 2 and 3 3/4, turn 90 degrees and score the same measurements on that end. Fold and burnish the score lines as such, first score line is a mountain fold, second is a valley fold, third is a valley fold and the fourth is a mountain fold. This gives the zig zag fold. 
  3. Now add your dsp layers. Cut 2 pieces measuring 1 3/4 x 3 3/4. Add these to the outer panels of the zig zag fold. 
  4. Cut a piece of Basic White measuring 3 1/4 x 3 3/4 and adhere to the centre panel of the zig zag fold. 
  5. Adhere the zig zag fold to the base, centering it as best you can. It will look like this. (The paper clip is just to hold the flaps down for the photo).


6. For the top panel layer a piece of Basic White for your image/sentiment. Be sure to do any stamping before you attach the top panel to the zig zag fold.

7. Next, add the top panel to the zig zag fold, making sure only the left side of the top panel is attached to the far left fold. Gluing the entire top panel will stop your card from opening. 

Your finished project will look like this.


Please reach out if you have any questions.

Thanks for stopping by. Until next time...

Paula


Sunday, June 11, 2023

Step Fold Card

 Hello,

Today's card is a step fold. 

For this card I chose Calypso Coral card stock for the base to measure 8" x 5 1/2", scored at 3", 6" and 7". 
The 3" score line will be a mountain fold, the 6" score line a valley fold and the 7" score line a mountain fold. Burnish all score lines. 
For the DSP, I used Awash in Beauty, cut a piece measuring 2 7/8" x 5 3/8" and another piece at 7/8" x 5 3/8". adhere them to the front as shown above.

For the front panel, cut a piece of card stock measuring 3" x 6" and score at 4 1/4". Burnish. Cut a piece of DSP measuring 2 7/8" x 5 7/8" and adhere to the front panel card stock.


Adhere the front panel to the bottom strip of the step then adhere the other end to the top part of the back of the card. There will only be a slim margin to adhere. In the above photo, I added a piece of white card stock to cover the seam. Totally optional. The white card stock measures 2 7/8" x 5 3/8".
You could also add a piece of white card stock to the inside, same measurements for a sentiment or personal greeting.

Next is to decorate the front. Use any shape, sentiment or embellishments. The sentiment for this card is from the Earthen Textures stamp set.

And there you have a step fold card. I hope you give it a try.

Thanks for stopping by. Until next time....


Paula

Monday, May 22, 2023

Flap Fold

 Hello,

An easy fun fold for today. It's a flap fold.


Take a piece of card stock measuring 5 1/2" x 8 1/2" and score at 1 1/4" and 4 1/4". Fold the 1 1/4" score line into a mountain fold and the 4 1/4" score line into a valley fold. Burnish.
There is your flap fold. Now to decorate. 

Cut DSP as follows:
2 3/4" x 5 1/4 " for the front
1'"x 5 1/4" for the narrow flap
4" x 5 1/4" for the base
Adhere all the pieces.

Also cut out of white card stock, a piece measuring 2 3/4" x 5 1/4" for the inside for a sentiment. Alternatively, a piece of DSP can be adhered to the inside instead of white card stock and then add a piece of card stock to the back of the card measuring 4" x 5 1/4". It depends on how much space is required for a personal note.

For the front focal point, I opted to cut a circle and adhere some foliage from the Splendid Thoughts bundle. Adhere to the narrow flap, centering it on the front. Be sure to add glue to just a small part of the narrow strip when you add your focal point or the card will not open. (Ask me how I know 😕, you only make that mistake once). You can cut any shape to be your focal point.


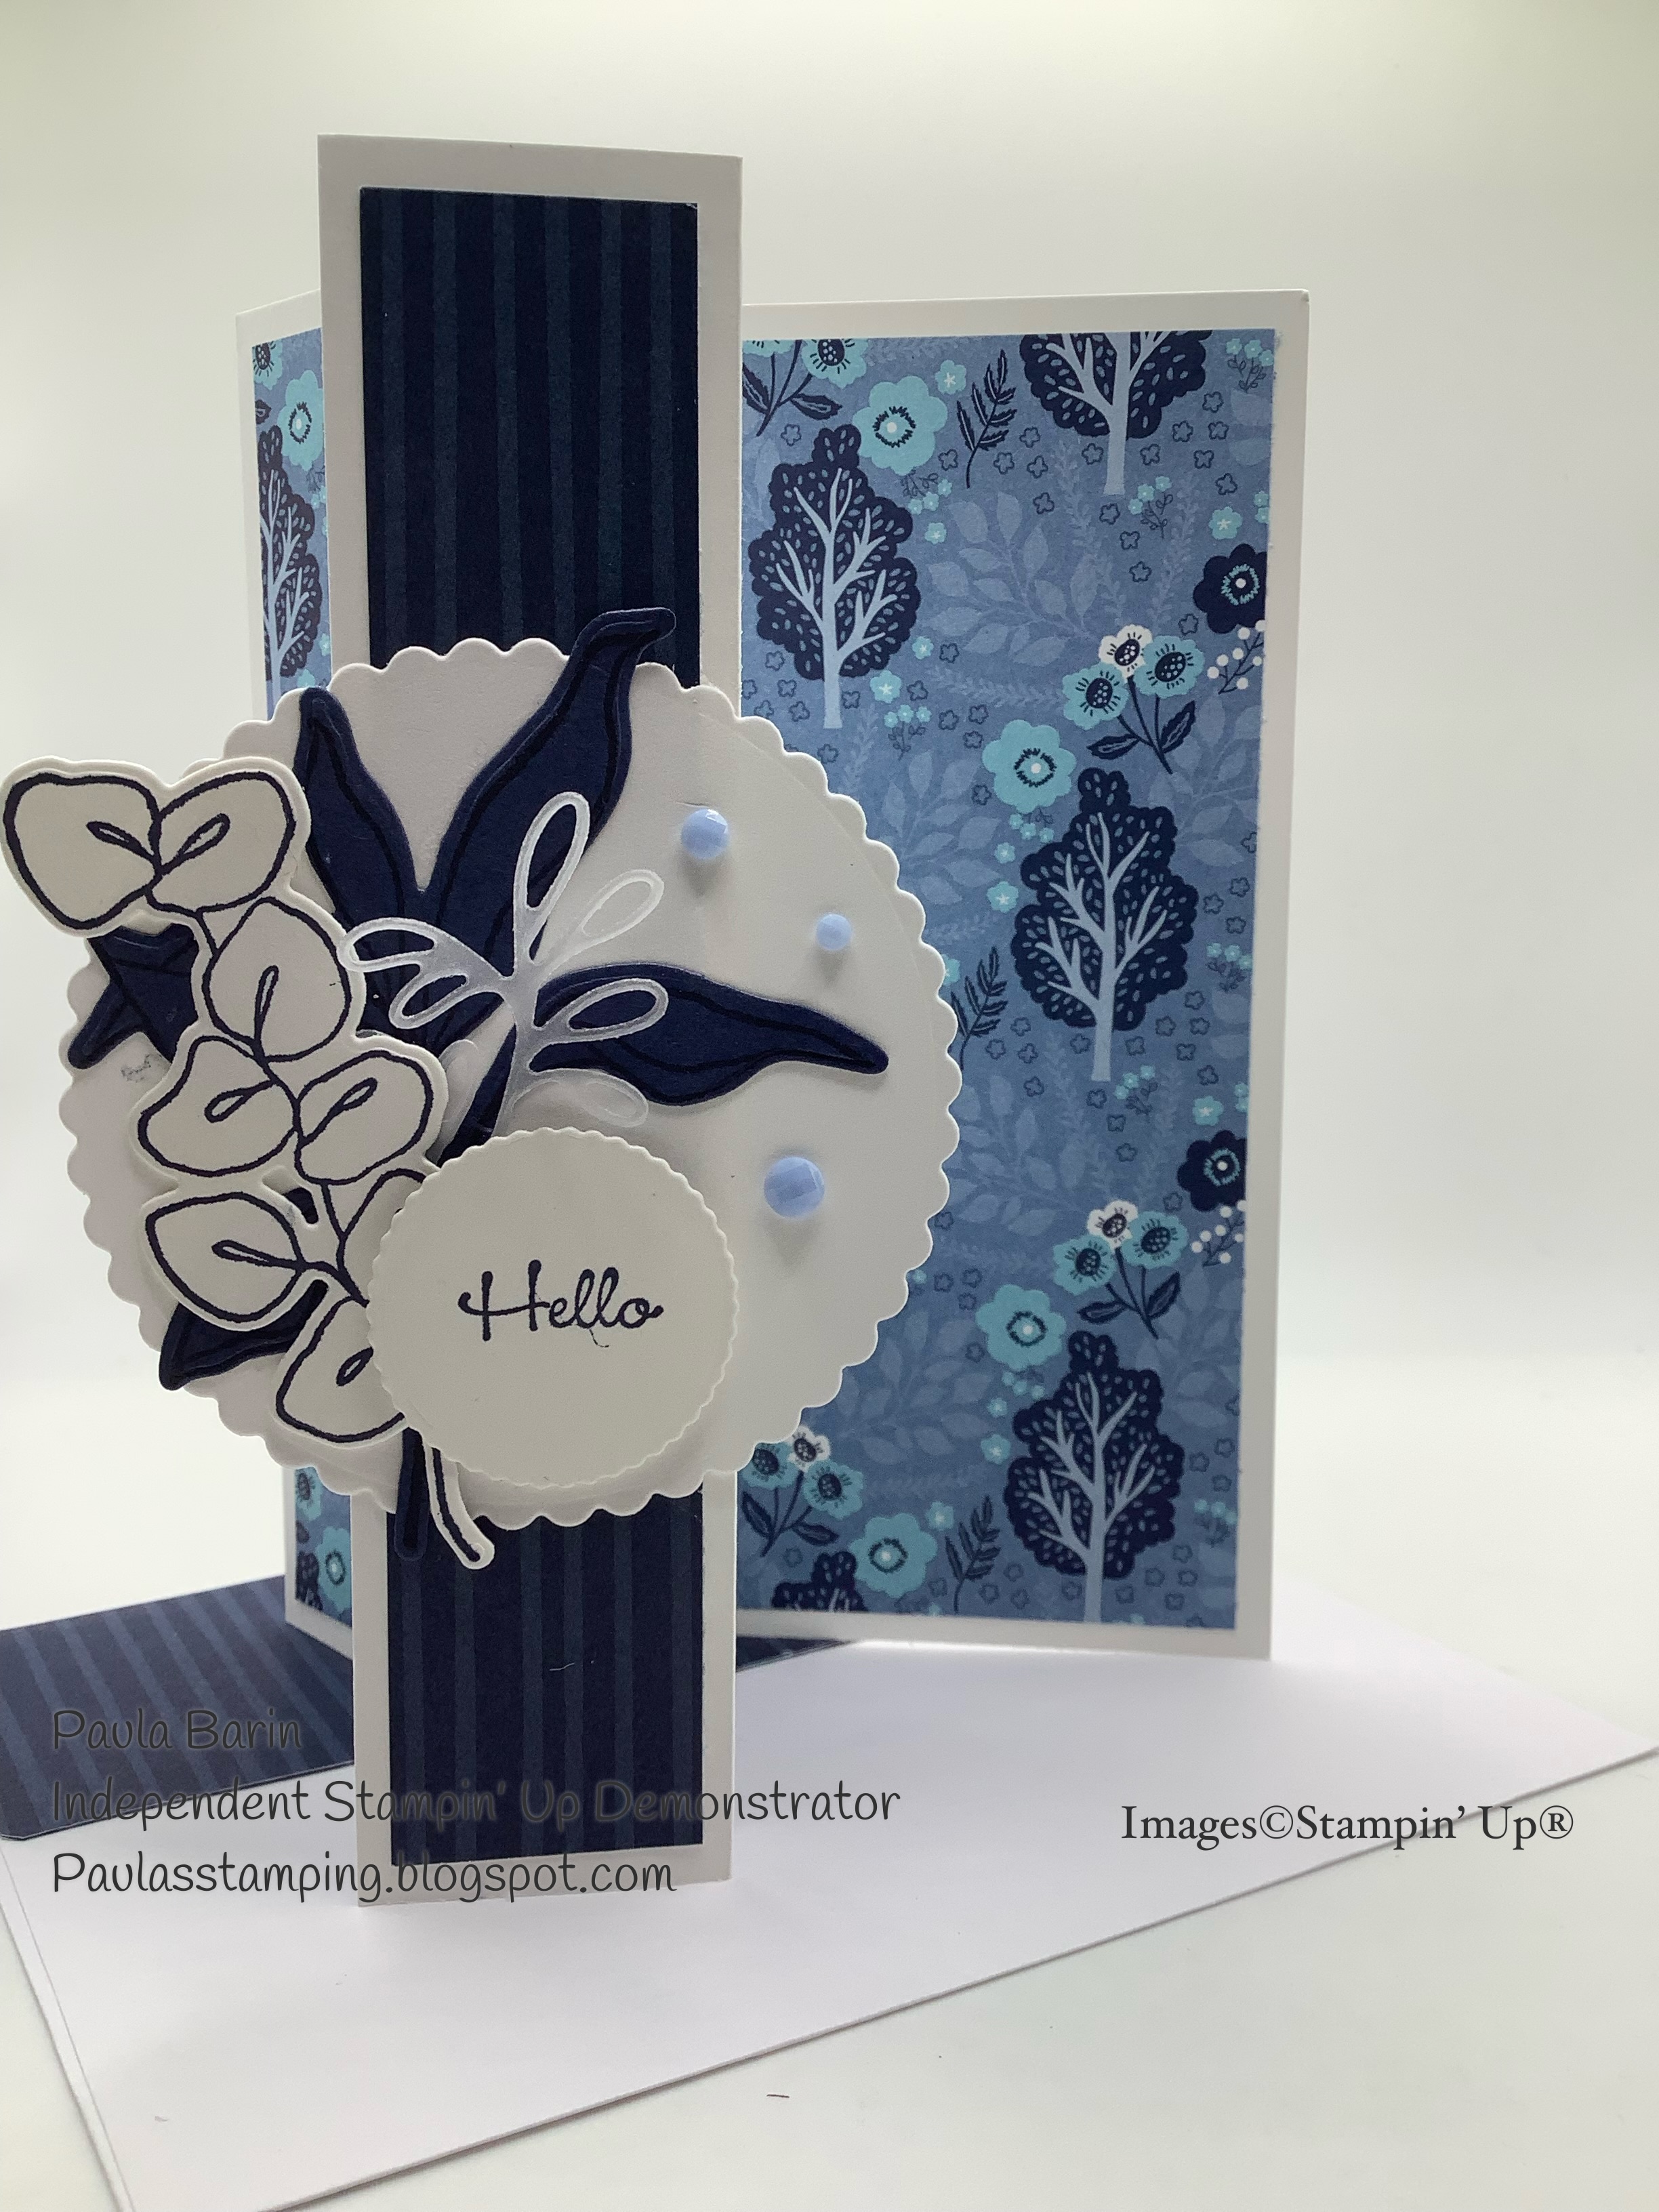
The Designer Series Paper is called Countryside Inn, item # 161467. I love all the shades of blue...Balmy Blue, Boho Blue, Misty Moonlight and Night of Navy.


There you have it!
Thanks for stopping by. Until next time...

Paula


Tuesday, May 2, 2023

Floral Z Fold

 Hello,

Today I've got a z fold for you. Very easy to make. For this card I used Petal Pink card stock and Tea Boutique DSP.


Instructions:
Card Base: 5 1/2" x 8 1/2" scored at 2 1/8" and 4 1/4"
DSP for the first two panels: 2" x 5 3/8" (cut 2)
DSP for the inside panel: 4 1/8" x 5 3/8" 

Band: 8 1/2" scored at 2 1/8" and 4 1/4"
DSP for band: 4 1/8" x 1 1/2" and 2" x 1 1/2" (cut 2)

Front panel: 3" x 4"
Layer: 2 7/8" x 3 7/8"

Inside layer for sentiment: 2 7/8" x 3 7/8"

Scraps of card stock for embellishments

Assembly:
Fold and burnish the score lines on the base. The first score line will be a mountain fold while the second score line will be a valley fold. Adhere the dsp to all the panels on the base. Adhere the inside layer for the sentiment to the back panel making sure it will be hidden behind the front layer, centering it on the back panel. Next adhere the band, ensuring only the last tab and half of the first tab are glued. I close the card and then adhere the band, making sure the card will open and close freely. Next add the front panel to the card. Stamp the layer then add it to the front with embellishments of your choice. 


There you have it. Thanks for stopping by. Until next time....

Paula


Friday, April 7, 2023

Fun Fold Favored Flowers

 Hello,

Today I have a diagonal fun fold I call Fun Fold Favored Flowers. Say that 5 times fast! 🤣

It's a busy weekend but I must take time to craft if just for my sanity. 


So easy to make. Here's how I did it. All measurements are in inches.

The base measures 4- 1/4 x 9- 3/4, score at 5- 1/2. Then score the smaller side ( left side) at a diagonal from top right to bottom left. Cut a piece of DSP to measure 4 x 4. Cut that DSP on a diagonal from top right to bottom left. Adhere those pieces of DSP to the front of the card. 

Cut  2 pieces of card stock, same as the base colour, to measure 4 x 1- 1/4. Cut  2 coordinating pieces of DSP to measure 1 x 3- 3/4. Adhere to the card stock pieces. Take one of those pieces and adhere to the right side of the base. Take the other piece, add dimensionals, and adhere to the base, butting up against the first piece as in the photo below. You can add dimensionals to both pieces but I chose not to. 


The popped up piece will allow the diagonal  fold side to sit against it. 
Now for the inside.

Cut a piece of Basic White to measure 4x4. Cut on a diagonal from top left to bottom right. Adhere to the left side of the inside of the base as in the photo above. Cut another piece of Basic White to measure 2- 3/4 x 4. Adhere to the centre section of the base. Decorate as desired.

For the front of the card cut your desired shape.  It could be a circle, square or rectangle. Add your sentiment and images or embellishments. Adhere to the front making sure only the bottom half is glued or your card will not open to display. 


There is plenty of room to write a personal note however if more room is required a panel can be adhered to the back of the card measuring 4 x 5-1/4.

That's it for today. Have a Happy Easter weekend. Thanks for stopping by.

Until next time...

Paula


Sunday, April 2, 2023

A Few Cards

 Hello,

It's been a busy week with appointments and such. I've had some time to craft but not to post. So, today's post is an update on some of the cards I made.

First up, this fun fold from Tami White. I cased Tami's card with a bit of a tweak. I am not good with angles. There is a pop up to this card which I just couldn't make work. You can see it on Tami's blog here. Check out her tutorial on how to make this card.

For my card, I chose the Sweet as a Peach bundle with a card base in Early Espresso.


I love this fun fold....its a card within a card.


So many dimensions.


This last section is where the pop up should be. I omitted the pop up and chose to decorate the panel instead.
And don't forget to decorate the envelope. It's a great way to use up scraps.


For my next card, I decided to break out the Potted Geraniums bundle, popping up the images on a Cane Weave background


Geraniums are usually a staple in my garden. They are hardy and bloom all summer. 

One of my favourite bundles is Happiness Abounds. Creating cards where the dies cut out the images on the DSP makes it easy to whip up a card.

By using scraps of DSP you can create a beautiful background for your images. 

Do you see a theme here? I love flowers. Most of my stamp sets are floral in nature, hence my fondness for feminine cards. I am trying to widen my stash to include more masculine stamps and DSP. 

That's all I have for today. Thanks for stopping by. Until next time....

Paula