About

Tuesday, March 21, 2023

An Irresistible Birthday Card

 Hello,

A gorgeous Spring day deserves a pretty fun fold using the Irresistible Blooms bundle. I love any floral stamp set and this one is no exception. 


Here is how the fun fold comes together. 
Cut a base measuring 4" x 5 1/2". and 2 pieces of DSP measuring 3/4" x 5 1/4". Adhere as in the photo below. 


Cut another piece at 8" x 5 1/2" and score at 1 1/2", 2 3/4", 5 1/4" and 6 1/2". Fold and burnish all score lines. 
 Decorate the scored piece of card stock by cutting 2 pieces of DSP measuring 5 1/4" x 1", and another piece of a coordinating DSP measuring 1 1/4" x 5 1/4". My preference was to leave a bit of a larger border however you can lessen the border by cutting the DSP a 1/8" larger.
Adhere the DSP as in the photo below.


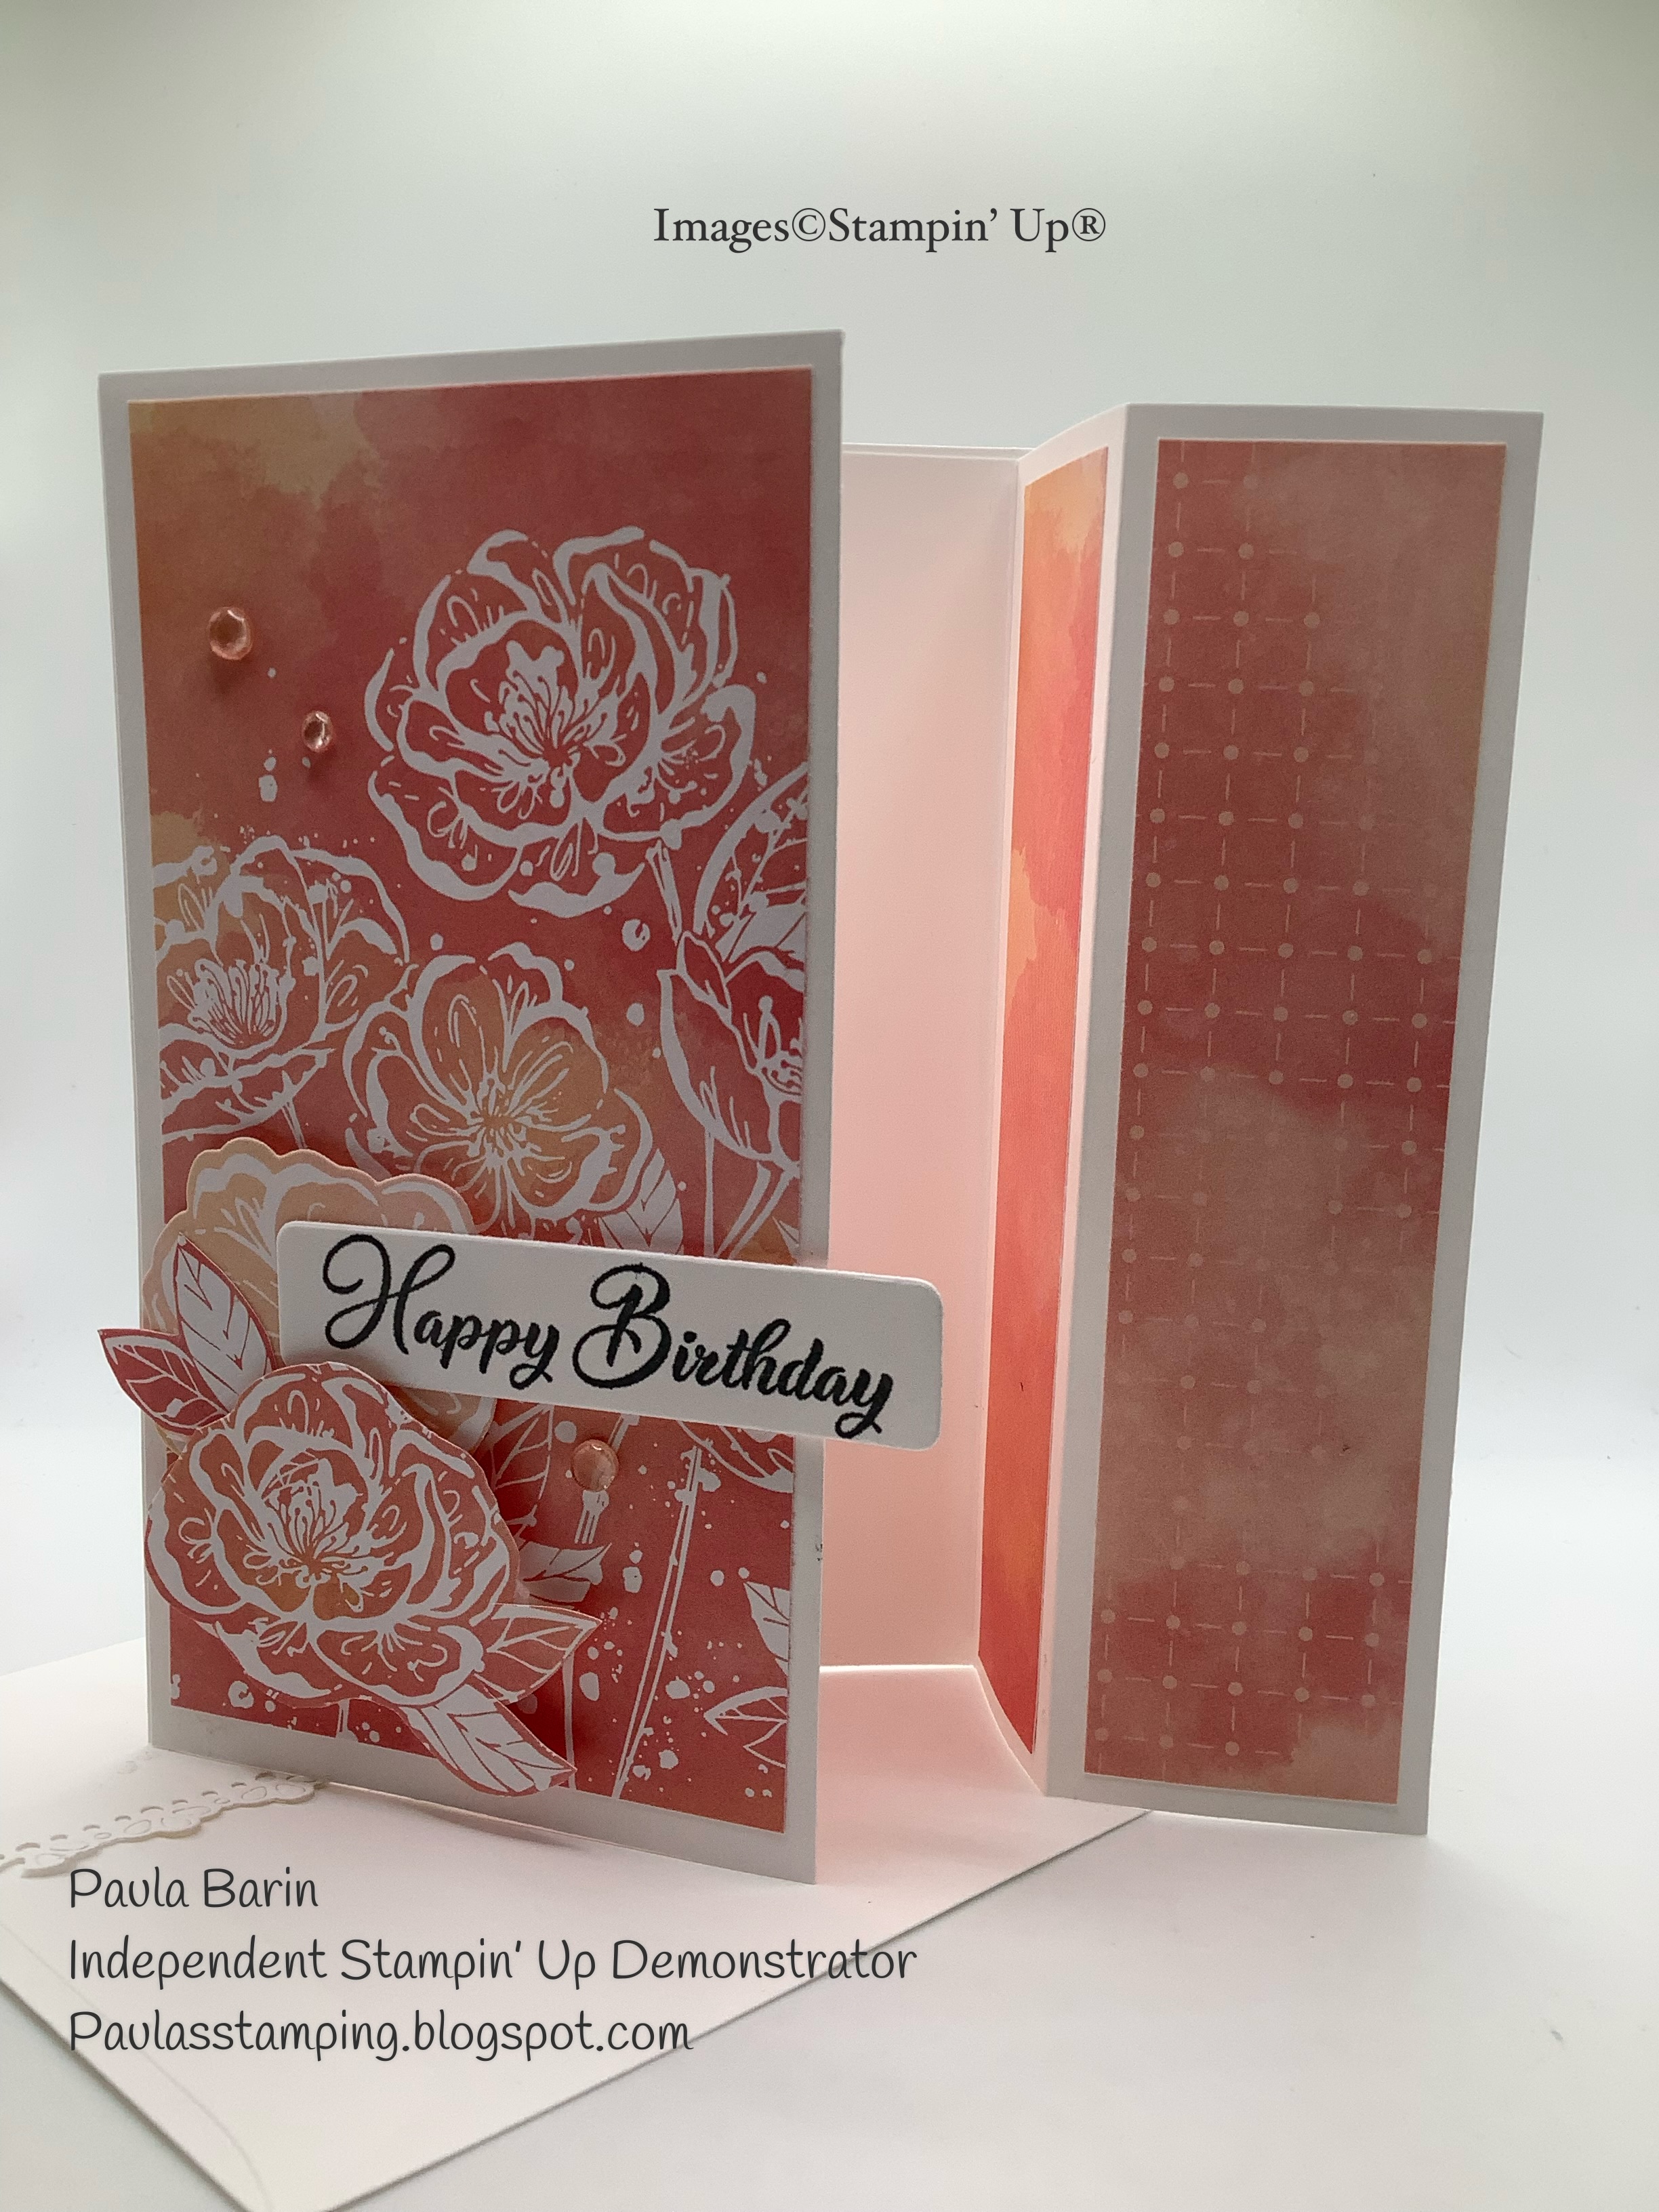
Once the DSP is added, adhere the scored piece to the base, ensuring the center part of the fold piece is in line with the bottom of the base so the card stands up and centering the the fold piece between the DSP on the base.


Now for the front of the card. Cut a piece of card stock measuring 3" x 5 1/2" and a piece of DSP measuring 2 3/4" x 5 1/4". Adhere the DSP to the front piece. Decorate as desired and add embellishments and a sentiment. Adhere this piece to the fold piece. *Important, add glue to the part of the fold piece which does not have any DSP on it. If glue is added to the entire front panel the card will not open (ask me how I know 😕)


Thanks for stopping by. Until next time...

Paula


Thursday, March 16, 2023

Double Fun Fold

 Hello,

Sick of me showing fun folds yet? I hope not because I have another one today.

I'm calling this one a double fun fold. 


Start with a base measuring 4 1/4" x 11" and score at 2 1/2" and 5 1/2". The first score line is a mountain fold and the second score line is a valley fold. Decorate the panels as desired. For this card I used the Dainty Flowers DSP measuring 2 1/4" x 4" for the first panel and 2 3/4" x 4" for the second panel. The inside of the card or last panel measures 4"x 5 1/4".

For the flap fold cut a piece of card stock measuring 3 1/2" x 6" and score at 3". 


For the inside of the flap, cut a piece of card stock for your personal message, measuring 2 3/4" x 3 1/4" and adhere. For the front of the flap, if desired, cut a piece of coordinating dsp measuring 2 3/4" x 3 1/4" and a piece of card stock for your image or sentiment measuring 2 1/2" x 3". Adhere. 


Centre the flap to the back inside of the base and adhere. 
And there is your double fun fold.

Thanks for stopping by. Until next time...

Paula


Tuesday, March 14, 2023

Easter Fun Fold

 Hello,

I'm back with another fun  fold today. This one is easy peasy to make. 


First, cut a card stock base measuring 4 1/4" x 11" and score at 5 1/2". Select your DSP and cut to measure 4" x 5 1/4". Adhere to the card base, making sure only the edges are glued leaving the centre  of the card unglued. For the opening, choose a shape...could be a circle, square or oval. Centre the desired shaped die to the front of the card and run it through your cutting machine. Save the off cuts. 


For the inside fold, cut a piece of card stock measuring 5 1/4" x 8" and score along the 8" side at 4" and 6". Adhere the piece to the inside of the card, gluing the 4" x 5 1/4" side to the card base.

Here is where the off cut shape comes in. With the card closed (and the inside piece folded into the card) adhere the die cut shape, gluing only half of the  shape to the folded piece showing through the opening,  making sure the shape is centered, as in photo above.


The front of the card should be free to open and close. At this point you can decorate the front of the card. 

Card stock used: Petal Pink
DSP: Country Gingham
Embellishment: Favored Flowers die cut from Hello Irresistible dsp
Stamped Flower: Irresistible Blooms
Sentiment: Easter Friends stamp set

Thanks for stopping by. Until next time....

Paula


Sunday, March 12, 2023

A Birthday Fun Fold

 Hello,

Today's card has a wow factor. Thank you to Rose Coleman for this layout. 

For my card I used a base of Evening Evergreen and layered Fancy Flora DSP. 


The base measures 8 1/2’’ x 5 1/4’’ scored at 2 1/8’’, 4 1/4’’ and 6 3/8". 
Pop Up Mechanism: 1’’ x 5’’ scored at each end at 1/2". 
Wing Flaps (2 pieces): 1’’ x 1 1/2’’ scored at 3/4’’ on the 1 1/2" side
Belly Band: 1’’ x 11"
Scraps for your image and sentiments.
Fold and burnish all score lines.


For decorating, cut 4 pieces of dsp measuring 1 7/8" x 5". Two pieces will be adhered to the front of the card and two will be adhered to the inside flaps. As in the photos above.

For the mechanism, add glue to the 1/2" sections on either end of your 5" strip. Place the strip in the centre section of the card, ensuring the score lines of the base are not impeded and the card can fold closed.
For the wing flaps that hold your sentiment piece, Place glue on the back of the fold on each piece and place in the centre of the 5" strip, folded ends butted up against each other. Ensure the pieces line up with the score line on the base.


Adhere your image or sentiment piece to the free ends of the wing flaps.

For the belly band, gently fold the strip around the base so the closure is on the front of the card. Try not to make the fold too tight as the band will not slide off easily. Glue the ends together and adhere the image piece to the front of the belly band.

The sentiment or image pieces can be any shape...square, rectangle or circle. 
I hope the instructions are clear. If you require further clarification, check out Rose's tutorial here

Thanks for stopping by. Until next time...

Paula


Saturday, March 4, 2023

Tri Fold Card

 Hello....from snowville!

We got 35cm of snow dumped on us last night. It's the heavy wet kind. I am so over winter. Bring on spring. 

Here is a spring like card called a tri fold. I found the fun fold over on Instagram at Nudgenudgeinkink. 


This fun fold is a great way to show off double sided or coordinating designer series paper.  Here, I fussy cut the flowers from the Fitting Florets DSP.

Begin with a piece of card stock measuring 5 1/2" x 11" and score at 3 3/8" and 7 5/8". From  the top corner measure down 1 1/2" and make a tic mark. From the score mark cut diagonally to the tic mark. 

The card can be closed using a belly band, mini magnets or velcro dots. I hope you give this fun fold a try.  

Thanks for stopping by. Until next time....

Paula


Wednesday, March 1, 2023

Fancy Flora Fun Fold

 Hello,

I can't believe it's March already!

February was a blur....literally. I had some eye surgery which made it difficult to craft. Thankfully I had a stash of cards made in order to post on FB and IG. 


Today's fun fold uses Fancy Flora DSP which I love because of all the beautiful colours.


I've paired the DSP with the Biggest Wish stamp set for the sentiment and the Chic dies for the flower and mesh cut out.


Fun folds add such interest to cards and this one is easy to make. Cut the card stock to 4 1/4" x 11" and score at 5 1/2". Cut the front of the card stock on the diagonal from top right  at the fold to bottom left. Cut a piece of dsp at 4" x 5 1/4" and cut the same way. 
This card can be in vertical or horizontal orientation. Just be sure to cut your dsp accordingly.

Thanks for stopping by. Until next time....

Paula