About

Saturday, February 26, 2022

Driving By- Vellum Style

 Hello,

I recently saw Lisa from  Lisa's Stamp Studio make some vellum cards. I decided to give it a whirl. 

Now scoring vellum can be tricky. It is a very delicate paper and requires a light touch when scoring (ask me how I know 😏). Also when burnishing the fold, use use your fingers, don't use a bone folder (again, ask me how I know).


With vellum lots of layers of card stock are used to cover the glued pieces. This also makes the vellum base more stable. 


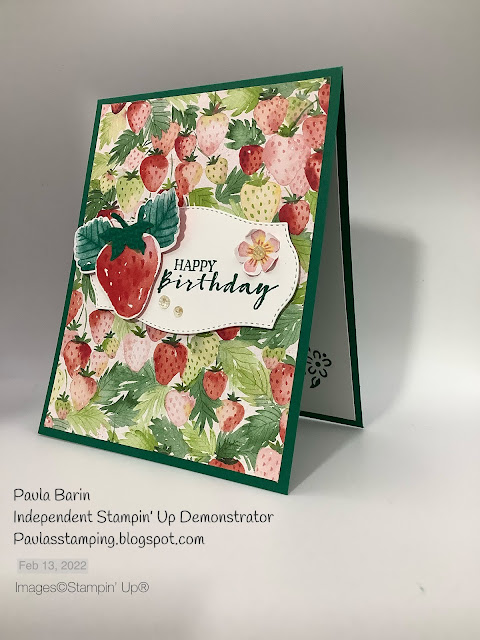
This card measures 4.25" x 5.5". The insert measures 2.75" x 4" as do the panels on the front and back side. 

Thanks for visiting.

Until next time.....

Paula


Thursday, February 24, 2022

Daffodil Birthday Card

 Hello,

It's almost balmy here with the temperature going up to -3C today. The sun is shining and hopefully the snow will melt, making way for daffodils to peek their heads through the ground. Until then, I have today's card to share.

I am often challenged when it comes to dies where the cut outs have to be assembled. When I see these dies in the Stampin' Up catalogue I immediately fall in love with them and bam! they're in my shopping cart. I never stop to think "How do I assemble these"? Memories take me back to the pansy suite 😕

Thank goodness for amazing card makers out there who share tutorials on putting together the die pieces. Thank you crafters!

This card is a simple, feminine birthday card. I embossed a piece of card stock to adhere to the base then cut a piece of Sunshine and Rainbows DSP using the scalloped die from Color and Contour to adhere next. I wasn't sure how I wanted the daffodil dies to look but knew I wanted pink. Aha! use the Simply Marbleous DSP. With varying shades of pink, the paper would be perfect for cutting out the dies. I like the way the card turned out.


Sometimes I overlook die sets to use for layering or to stamp a sentiment on. In the Perfect Parcel die set there is a pretty filigree die. Here, I used vellum to layer under the sentiment. The tag is from the Tailor Made Tags die set. Perfect for smaller sentiments. Just added a bow and viola! a card is born.  


Thanks for visiting. 
Until next time.....

Paula


Tuesday, February 22, 2022

Flowering Rain Boots part 3

Hello, 

I am a little obsessed with the Flowering Rain Boots Bundle...can you tell? This set is so much fun to create with, adding the flowers to all sorts of containers. 

For this card I went back into my stash and found the milk can from the Country Home stamp set. 


I can see almost any colour used for the tulips and coordinating card stock when paired with a black and white buffalo check. Very country, yes? 

Until next time....
Thanks for visiting.

Paula


Sunday, February 20, 2022

Flowering Rain Boots part 2

 Hello,

Back with another Flowering Rain Boots card. This time I am using the tulips stamp and dies. They pair perfectly with the Flowering Fields DSP. I softened the look of the DSP with a piece of vellum so the focal point would be the tulips in the pots. 


 Until next time....

Thanks for visiting.


Paula


Saturday, February 19, 2022

Flowering Rain Boots

 Hello,

When I place a Stampin' Up order I always look forward to receiving it. This time, I was soooo excited to receive the Flowering Rain Boots bundle. This set is so cute. 


The bundle also includes the rain Boots dies.


The bundle is available in the January-June 2022 Mini Catalogue, #157691

This set has wonderful sentiments of encouragement but can also be used for shower cards, birthdays and Easter cards. 

For today's card I chose the sentiment 'Rain or Shine I'm here for you'. The Sunshine and Rainbows DSP pairs perfectly with the stamp set as does the Garden Gems for rain drops. 


What are some of the ways you would use this set?

Until next time....
Thanks for visiting!

Paula


Friday, February 18, 2022

Gift Bag


 Hello,

Today I awoke to a winter wonderland. Yesterday it rained then turned to freezing rain then snow. Fun...NOT! Now I have to shovel. However it does look pretty out there. The freezing rain turned to ice has settled on the trees and the branches are glistening in the sun looking like diamonds. And who doesn't like diamonds 😊

On to my project for today. It's a gift bag made from two 12 x 12 sheets of DSP. The bag's finished measurements are 9" x 10"x 1 1/2". Thanks to Julie at The Paper Haven for the tutorial. You can watch it here. It's best to watch Julie make the bag as I am rubbish at explaining how to's.


This bag can be made with any 12 x 12 DSP for any occasion. For extra stability, cut a piece of cardboard measuring 9 3/4" x 8 3/4" x 3/4" to lay on the inside bottom of the bag. The cardboard can be wrapped in tissue paper or more of the same DSP as the bag. For this project I used the Daffodil Afternoon DSP.


If your DSP is directional, take note of the orientation. 


Until next time....


Paula


Wednesday, February 16, 2022

Trio of Cards

 Hello,

Today's project is a trio of 3 x 3 cards packaged in an acetate box. 


I remember when this was the size card included in a gift, ie a shower gift.

I used the Cactus Cuties stamp set which has quickly become one of my favourites. I'm a plant person so how could I not love this stamp set. 


These cards are very simple....a bit of dsp, embossed background, the image and a sentiment. All wrapped up in tiny cards.


Until next time....

Paula


Sunday, February 13, 2022

Tulips

 Hello,

Nothing says Spring like tulips. Flowering Fields DSP has some of the prettiest designs and colours.

This card is an easy easel fold.

The card measures 5 1/" x 4 1/4" and folds flat into a regular envelope.


Recipe:

Card stock base: 4 1/4" x 11" scored at 5 1/2" (valley fold) and 2 3/4 " (mountain fold)

Top layer: 3 1/2" x 4 1/4"

DSP for top layer: 3 3/8" x 4 1/8"

DSP for inside: 4 1/8" x 5 3/8"

White card stock for inside: 3" x 4"

The top layer is only adhered to the mountain fold portion of the front of the card. 


Until next time...


Paula

Strawberry Fields

 Hello,

It's Sunday....a day to relax and craft! 

Looking at my stash of Designer Series Paper (and I have a lot), I decided to use some discontinued favourites. Berry Delightful has numerous designs to choose from in various colours, all coordinating with SU's cardstock. Use what you have, right?


This stamp set always reminds me of summer when the local strawberries are ripe for picking and taste oh so juicy.

Okay, so here's my card. 


This punch is from a dollar store. I do not recommend punching card stock with an inexpensive punch. It got stuck and took me forever to get the card stock out of the punch. 😒

Until next time...

Paula


Saturday, February 12, 2022

More Cactus Cuties

 Hello,

Frigid temperatures this weekend so it's a great time to stay indoors and craft. 

A great way to add interest to your cards is to layer. These layers can consist of embossed paper, a variety of designer series paper or die cut elements. Adhering dimensionals will also add pop to your card.

For this card I layered die cut circles and also used the Plaid Builder die to mimic a window pane.


Think of ways you can add interest to your cards. I'd love to hear your ideas. Leave a comment below.


Until next time....


Paula

Wednesday, February 9, 2022

Driving By Meets Collecting Butterflies

 Hello,

I love combining stamp sets. Mixing and matching can extend the creativity of your cards. 

For this card I combined the balloons from the Driving By stamp set with the girl image from the Collecting Butterflies stamp set. I masked off the butterfly net with tape, inked the image, removed the tape and stamped on card stock. I made a mask of the girl image and stamped the balloons over it.


Tip: Cut apart images so they can be used for different projects. If you're careful while cutting, the images will fit together perfectly again.

Until next time...

Paula


Tuesday, February 8, 2022

Corner Tuck Fun Fold.


Hello,

This fun fold is called a corner tuck card. Part of an image is tucked under a sentiment or embellishment. Here, the front fold is tucked under the sentiment just at the upper right corner. 


The fold pops out to uncover images or sentiments.


The Misty Moonlight part of the fun fold measures 6 3/4" x 2 1/4". Each  Basic White square for the image measures 2" x 2".


Still lots of room for a personal greeting on the inside. 

Until next time....

Paula


Wednesday, February 2, 2022

Slim line Sweet as a Peach Card

 Hello,

Kind of a blah day here... it's raining before the next brutal snow storm. So, I took the opportunity to rearrange my craft room. It took a couple of hours but it seems more functional now. 

I realized I have oodles of DSP. I must get over the hoarding of paper. I should use it instead of saving it....isn't that why I purchased it??? It's just so pretty though.

Today's card is made from my DSP stash. You're a Peach Designer Series Paper. The sentiments and branch with flowers is from the Sweet as a Peach bundle. 


Slim line cards are great for large images or DSP with lots of detail. 

This slim line card measures 7" x 8 1/2", scored at 3 1/2" on the 7" side. I used Thick Basic White.
The Balmy Blue layer measures 3 1/3" x 8 1/4" with a layer of DSP measuring 3" x 8". 
One of my favourite die sets is Stitched So Sweetly, perfect for this sentiment.

As I don't make very many slim line cards, I made the matching envelope. Take a piece of DSP measuring 10" x 10 1/2" and score at 3" and 7" on the 10 1/2" side. Rotate the paper and score at 1/2" and 9". Fold and burnish the score lines. I used Tear and Tape to adhere the flaps, leaving the top flap open. 

Until next time....

Paula