About

Showing posts with label Birthday Cards. Show all posts

Tuesday, June 13, 2023

Berry Blessings

 Hello,

Short post today. I am getting ready for my new dishwasher install. Hurray!

In keeping with my berry cards, here is one using the Berry Blessings stamp set.


Gotta scoot. Wish me luck that all the plumbing goes well. 🤞

Thanks for stopping by. Until next time...

Paula


Monday, February 6, 2023

And now for something different...

 Hello crafty friends,

Today's card is something different...at least for me. I saw a card on IG that inspired me. 


The front of the card is see through! I used the Artisan Addition die.

 If you have any kind of see through type die it would work. Alternatively, a piece of acetate could be used and then a die cut image would be adhered to the front. This die is a bit smaller than a regular card and measures 3 1/8" x 4 5/8". I added 1/8" to the top and scored it to provide a "lip" to adhere the front panel. To make the front a little more stable, I cut 2 pieces of the die and glued them together.


The flower image is from the Framed Florets stamp set. 

The colours used were Pale Papaya and Soft Succulent. 


Because this card is smaller than an A2, I made an envelope using an  envelope punch board.


It's a cute little card to tuck in with a birthday gift or would make a lovely wedding card.

Thanks for stopping by. Until next time...

Paula


Sunday, January 22, 2023

Card and Box Envelope

 Hello,

Ever make a card with a few embellishments which will not fit into a regular envelope? Well, I've got an envelope box for you!

This box will fit a card with a good amount of height, about a quarter of an inch. 


I found the template here Envelope Box tutorial for dimensional cards. – Club Scrap. It's very easy to make and will fit a 4 1/4" x 5 1/2" card with 1/4" height. And bonus, when using Stampin' UP double sided designer series paper, the inside of the box is as pretty as the outside. 
I added a narrow strip of dsp so that the flap would close without gluing. Alternatively, a piece of tear and tape could be added prior to giving.


This layout is a great way to use up some scraps of designer series paper. 

Thanks for stopping by. Until next time.

Paula


Wednesday, November 9, 2022

Pop Up Box Fold Card

 Hello,

I love fun folds. Sometimes the fun folds don't like me...especially where angles are concerned. For me, they never match up.  

I had my misgivings about this particular fun fold. Would it lay flat? Would the edges match up? Well, yes to both questions. I saw Lisa Curcio make this card and wanted to give it a whirl. It looks intimidating but it was really easy to make. 


There is a bit of bulk with the "box" layers, but it still fits in an A2 envelope. 


You can see how the boxes are attached to the base.  And here is the back of the card, ample space to write a note. If you wanted to stamp a sentiment, I recommend stamping before adhering to the base. 


Here is another card in a different colour.


You can find the tutorial on Lisa's blog here. And watch Lisa's video here.

Thanks for stopping by. Until next time....

Paula


Monday, May 2, 2022

Hues of Happiness

 Hello,

Let me tell you, the new Hues of Happiness collection which will be available for purchase May 3rd from the new Annual Catalogue May 2022-April 2023, is absolutely gorgeous. I love florals and the DSP does not disappoint in beautiful flowers. 


Here are two cards I made with the new Hues of Happiness DSP.
In shades of purple using Fresh Freesia for the base.

And...

Shades of yellow using Mossy Meadow for the card base. 

I know you'll love these beautiful papers. After the catalogue launch I can share more photos of the dsp and other items from Hues of Happiness collection.

Thanks for stopping by.

Until next time....

Paula


Thursday, April 7, 2022

Nature's Harvest

 Hello,

I've been delinquent in my posting lately. Life sometimes just gets in the way of crafting. 

I am trying to use up my stash of DSP to make room for new DSP from the upcoming Annual Catalogue. There are so many beautiful papers and I cannot resist them. 


I made today's card from the Harvest Meadow DSP. One of my favourite SU colours is Misty Moonlight (soon to retire 😭).  I cut out some Nature's Harvest dies from cards stock and the Vellum Layering Designs. The sentiment is from a retired stamp set called Bring on the Cake. I love the pretty font. 


Thanks for stopping by.

Until next time....

Paula

Wednesday, March 30, 2022

Tri Fun Fold

 Hello,

It's been a while. Just busy with life 😊.


Today's card is a tri fold birthday card. I'm trying to use up some of my DSP and I have mounds of it. There is something about paper, especially Stampin' Up paper that I love. The colours, the patterns the coordination....love it all. 

For this card I used the Pansy Petals DSP to coordinate with Soft Succulent card stock. The image is from Hello Cupcake (retired). It's so cute...who doesn't love cupcakes. They are smaller than a regular cake so less calories...right? 😂


Here is the recipe for the card:

Base: 4 1/4" x 11" scored at both ends at 2" and 3 3/4". Fold and burnish.

DSP Panels: 4" x 1 3/4"

Inside: 4" x 3 1/4"

Image base: 3" x 3"

White card stock for Image: 2 3/4" x 2 3/4"

The finished card measures 4" x 4 1/4"


Thanks for stopping by.

Until next time....


Paula

Tuesday, March 22, 2022

Corner Fold Card

 Hello,

Feeling a bit under the weather lately and lost my mojo. But, after surfing for ideas, I found this card idea on Stamp It Up with Jaimie. It's a corner fold card, very easy to make. It measures 5 1/2 x 4 1/4. 


It's great for any occasion and perfect for using up DSP scraps.

Base: cardstock measuring 5 1/2 x 8 1/2 and score at 4 1/4. 
 Measure down 2 " from the top right side of the front of the card and make a tick mark. In your paper trimmer, position the cardstock with the center fold down to the 2" tick mark in the track of the trimmer and SCORE. Fold the flap down and burnish. There's your card. 

Now decorate. Take a piece of DSP measuring 4 x 5 1/2. Again, measure 2" down from the top right side of the dsp and make a tick mark. Position the top left corner of the dsp down to the 2" tick mark in the paper trimmer and CUT. That piece will fit on the front of your card. Adhere. 
For the triangle piece, cut a piece of DSP measuring 1 3/4 x 3 3/4. Cut diagonally from the top left corner down to the bottom right corner. Adhere to the triangle flap of the card front. 
Secure the triangle flap to the front of the card with dimensionals. 

Cut a piece of card stock measuring 4 x 5 /14 for the inside of the card and adhere. Add a sentiment and image of your choosing. 

I can see making this layout a lot! 

Thanks for visiting. Until next time....

Paula


Wednesday, March 9, 2022

Pop Up Card

 Hello,

Today's card is a pop up card using the Flowering Rain Boots bundle and the Flowering Fields DSP.


The DSP really does the work for you. Adhering the DSP on to a scalloped piece of card stock adds that feminine touch.

The "ta da"🎵 is on the inside.


Pop up flower pots! Adding a neutral or slightly patterned paper behind the flowers grounds the "scene" without taking away from the focal point. I used the brick patterned DSP from Bloomed Where You're Planted. 


Once the flowers were cut out with the dies and adhered to the pots, I added them to  pieces of acetate or window sheets for stability. 

Here's how I did it....
Cut 2 pieces of card stock measuring 5 1/2 x 5 1/4. With the 5 1/4 side at the top of the paper trimmer, score  at 1" on both pieces, fold and burnish. Cut a layer  4” x 5 1/4". I used the scalloped die from the Color and Contour bundle to cut this piece. Next cut a piece of DSP at 3 3/4" x 5”. Adhere the DSP to the scalloped layer. This is for the front of the card. Add whatever sentiment you wish. 

For the inside, cut a piece of white card stock at 4" x 5 1/4" and cut with the scalloped die (optional). Adhere to one piece of the base card stock with the scored part at the top. Cut a piece of DSP measuring 4" x 5 1/4" for the other base piece. Adhere to the base with the scored part facing the bottom.

Now depending on the image used on the inside ( I used the Flowering Rain Boots bundle), cut 3 pieces of acetate measuring 1” x 3 ¾”. Because the image I used was shorter than 3 3/4" I cut it to about 2". 


With the scored flap folded towards the top with the DSP, add some tear and tape,  Remove the backing. Lay the acetate on the tear and tape, making sure they are evenly spaced. Press them in place. With the two scored parts facing up, adhere the two bases together sandwiching the acetate between the two pieces. Use some tear and tape to adhere your image to the acetate, ensuring the image used does not go over the edge of the card base.


And there you have it.

Thanks for visiting. Until next time....

Paula


Saturday, March 5, 2022

Whiskey Business

 Hello,

I love florals and foliage stamps so masculine cards can sometimes be challenging to make. I try not to overthink the design. Often embossing a background or a neutral colour will set the stage for a card. Then, it's just an image to decide on. 

I have a few stamps that are more masculine such as Whiskey Business.


For today's card I used the Vellum Layering Designs for the background and embossed a piece of card stock with the Timber embossing folder. Of course bows are out for a masculine card so the Brushed Metallic dots were the finishing touch.

Thanks for visiting.

Until next time...

Paula


Thursday, February 24, 2022

Daffodil Birthday Card

 Hello,

It's almost balmy here with the temperature going up to -3C today. The sun is shining and hopefully the snow will melt, making way for daffodils to peek their heads through the ground. Until then, I have today's card to share.

I am often challenged when it comes to dies where the cut outs have to be assembled. When I see these dies in the Stampin' Up catalogue I immediately fall in love with them and bam! they're in my shopping cart. I never stop to think "How do I assemble these"? Memories take me back to the pansy suite 😕

Thank goodness for amazing card makers out there who share tutorials on putting together the die pieces. Thank you crafters!

This card is a simple, feminine birthday card. I embossed a piece of card stock to adhere to the base then cut a piece of Sunshine and Rainbows DSP using the scalloped die from Color and Contour to adhere next. I wasn't sure how I wanted the daffodil dies to look but knew I wanted pink. Aha! use the Simply Marbleous DSP. With varying shades of pink, the paper would be perfect for cutting out the dies. I like the way the card turned out.


Sometimes I overlook die sets to use for layering or to stamp a sentiment on. In the Perfect Parcel die set there is a pretty filigree die. Here, I used vellum to layer under the sentiment. The tag is from the Tailor Made Tags die set. Perfect for smaller sentiments. Just added a bow and viola! a card is born.  


Thanks for visiting. 
Until next time.....

Paula


Sunday, February 13, 2022

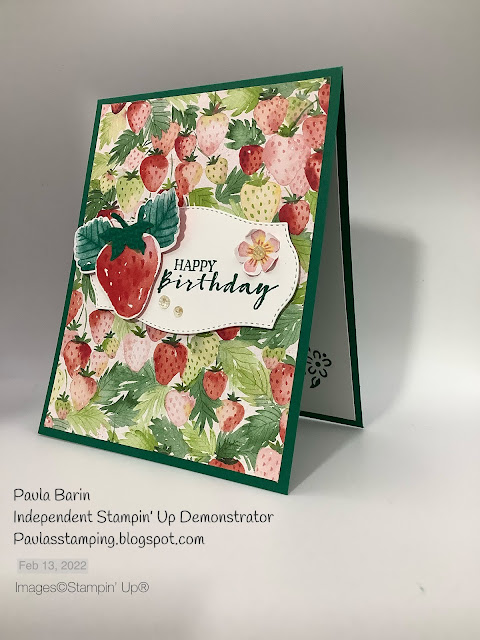
Strawberry Fields

 Hello,

It's Sunday....a day to relax and craft! 

Looking at my stash of Designer Series Paper (and I have a lot), I decided to use some discontinued favourites. Berry Delightful has numerous designs to choose from in various colours, all coordinating with SU's cardstock. Use what you have, right?


This stamp set always reminds me of summer when the local strawberries are ripe for picking and taste oh so juicy.

Okay, so here's my card. 


This punch is from a dollar store. I do not recommend punching card stock with an inexpensive punch. It got stuck and took me forever to get the card stock out of the punch. 😒

Until next time...

Paula


Wednesday, February 9, 2022

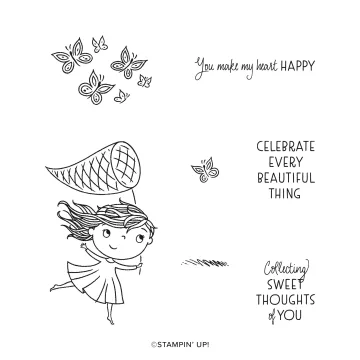
Driving By Meets Collecting Butterflies

 Hello,

I love combining stamp sets. Mixing and matching can extend the creativity of your cards. 

For this card I combined the balloons from the Driving By stamp set with the girl image from the Collecting Butterflies stamp set. I masked off the butterfly net with tape, inked the image, removed the tape and stamped on card stock. I made a mask of the girl image and stamped the balloons over it.


Tip: Cut apart images so they can be used for different projects. If you're careful while cutting, the images will fit together perfectly again.

Until next time...

Paula


Tuesday, February 8, 2022

Corner Tuck Fun Fold.


Hello,

This fun fold is called a corner tuck card. Part of an image is tucked under a sentiment or embellishment. Here, the front fold is tucked under the sentiment just at the upper right corner. 


The fold pops out to uncover images or sentiments.


The Misty Moonlight part of the fun fold measures 6 3/4" x 2 1/4". Each  Basic White square for the image measures 2" x 2".


Still lots of room for a personal greeting on the inside. 

Until next time....

Paula


Wednesday, February 2, 2022

Slim line Sweet as a Peach Card

 Hello,

Kind of a blah day here... it's raining before the next brutal snow storm. So, I took the opportunity to rearrange my craft room. It took a couple of hours but it seems more functional now. 

I realized I have oodles of DSP. I must get over the hoarding of paper. I should use it instead of saving it....isn't that why I purchased it??? It's just so pretty though.

Today's card is made from my DSP stash. You're a Peach Designer Series Paper. The sentiments and branch with flowers is from the Sweet as a Peach bundle. 


Slim line cards are great for large images or DSP with lots of detail. 

This slim line card measures 7" x 8 1/2", scored at 3 1/2" on the 7" side. I used Thick Basic White.
The Balmy Blue layer measures 3 1/3" x 8 1/4" with a layer of DSP measuring 3" x 8". 
One of my favourite die sets is Stitched So Sweetly, perfect for this sentiment.

As I don't make very many slim line cards, I made the matching envelope. Take a piece of DSP measuring 10" x 10 1/2" and score at 3" and 7" on the 10 1/2" side. Rotate the paper and score at 1/2" and 9". Fold and burnish the score lines. I used Tear and Tape to adhere the flaps, leaving the top flap open. 

Until next time....

Paula


Saturday, January 29, 2022

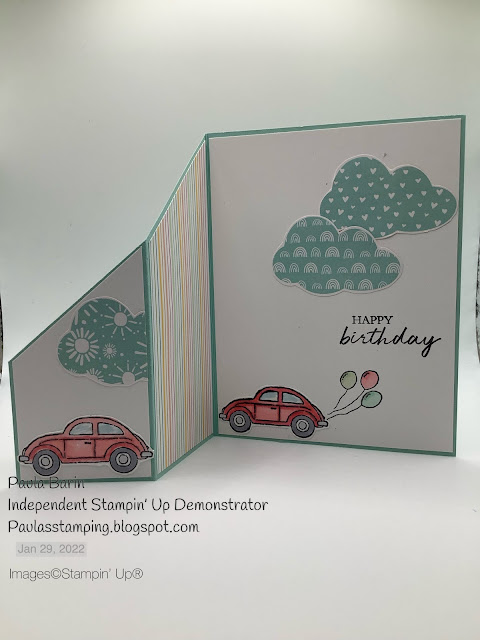
Driving By Birthday Card

 Hello,

Brrrr, it is absolutely frigid outside. A good day to craft.

Today's card is a fun fold, easy to make. The card measures 5 1/2" x 4 1/4". Start with a piece of card stock measuring 8 1/2" x 5 1/5" and score at 4 1/4" and 2 1/8". From the middle score line, cut diagonally down to about 2" from the bottom. There's your fun fold. 


This card is great for any occasion. Add DSP, embellishments and images or keep it simple.


The important thing is to have FUN with it.

Until next time....

Paula