About

Saturday, December 10, 2022

Crackers

 Hello,

Is time flying by or what? Only 15 days until Christmas. Are you ready? I'm glad all my Christmas cards are done and mailed. Now, I am making some hostess gifts. 

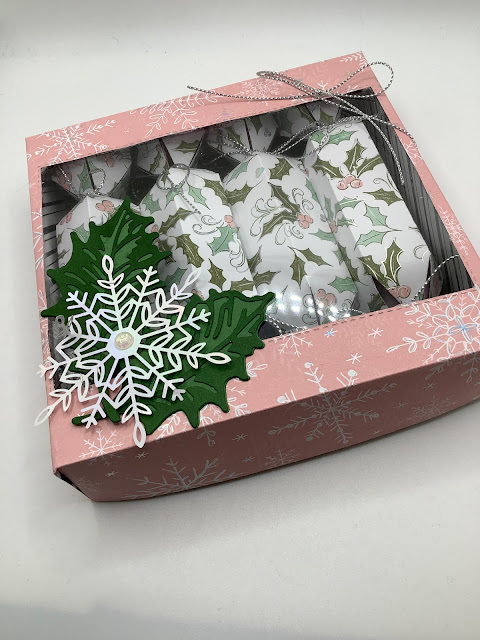
Today's projects were these crackers. So easy to make with the Cracker and Treat Box dies  from Stampin'Up. 

Item # 159182


The crackers do not 'snap' but they are large enough to hold a couple of chocolates. Think those little chocolate balls in foil. A message/sentiment could also be included. I should have thought of that at the time I was making them but forgot 😔


The crackers nestle perfectly in this box from Stampin With Tami (Tami White). The box is so easy to put together. This box was made entirely from DSP. I didn't have 12 x 12 card stock to make the bottom of the box, however DSP is strong enough to hold the crackers. 
You can get Tami's instructions and video for assembly HERE.

Here is another version of the crackers and gift box.

The box measures 5 1/2 x 5 1/2 x 1/ 1/4 inches.

 Thanks for stopping by. Until next time.

Paula


Tuesday, November 22, 2022

Whimsical Trees Fun Fold

 Hello,

I've got an easy fun fold for you today. 


Searching through my stash of DSP and stamp sets, I found Whimsical Trees. I think Stampin'Up has the prettiest shades of green. For this card I used Mint Macaron. 
The fun fold is simple, a couple of score lines and that's it. 

The Mint Macaron base measures 5 1/2" x 8 1/2" scored at 4 1/4". The Basic White insert measures 5 1/4" x 8" scored at 4" and 6". Adhere the white insert, 4" x 5 1/4" section only leaving the 2" scored sections free, as in the photo below.
Now you can decorate as desired.  For this card, I chose to die cut a circle out of the front of the base. For a different look, you can omit a die cut opening on the front of the card and decorate with DSP, die cuts, sentiments and embellishments.


You can choose any shape you like. Use the die cut for your image and sentiment. Adhere the shape to the outside 2" scored piece, ensuring the shape matches up with the cut out section on the front of the card. I added glue to half of the circle, closed the card then adhered the circle to the section showing through the opening.  


You can choose to add coordinating dsp for the sections as I did. The strips measure 1 3/4" x 5". The card lays flat and fits into a medium envelope. 

I hope you give this fun fold a try.

Thanks for stopping by. Until next time.


Paula

🎄

Friday, November 11, 2022

Mixing and Matching

 Hello,

I love the way Stampin' Up coordinates all of their products, whether it be DSP and card stock or various stamp sets. 

For today's card I chose Ever Eden DSP and the Poinsettia Petals bundle. It's a bundle I love and will never part with. 


The front of the card features a mini card. 


Open the full card to reveal another sentiment and plenty of room for your own personal message.


The card recipe:
Evening Evergreen card stock- 4 1/4" x 11" scored at 5 1/2"
Ever Eden DSP layer- 4" x 5 1/4"
Front mini card in Evening Evergreen- 3" x 7 1/2" scored at 3 3/4"
Mini card DSP layer- 2 3/4" x3 1/2"
Inside of mini card Basic White card stock- 2 3/4" x 3 1/2"
Inside of card Basic White card stock- 4" x 5 1/4"

Thanks for stopping by. Until next time...

Paula


Wednesday, November 9, 2022

Pop Up Box Fold Card

 Hello,

I love fun folds. Sometimes the fun folds don't like me...especially where angles are concerned. For me, they never match up.  

I had my misgivings about this particular fun fold. Would it lay flat? Would the edges match up? Well, yes to both questions. I saw Lisa Curcio make this card and wanted to give it a whirl. It looks intimidating but it was really easy to make. 


There is a bit of bulk with the "box" layers, but it still fits in an A2 envelope. 


You can see how the boxes are attached to the base.  And here is the back of the card, ample space to write a note. If you wanted to stamp a sentiment, I recommend stamping before adhering to the base. 


Here is another card in a different colour.


You can find the tutorial on Lisa's blog here. And watch Lisa's video here.

Thanks for stopping by. Until next time....

Paula


Friday, November 4, 2022

Fitting Florets

 Hello,

Today I am showcasing the Fitting Florets Designer Series Paper. One of the things I like best about Stampin' Up is not only the coordination of DSP and card stock, but most stamp sets are mix and match. 

For this card I paired the Fitting Florets DSP with the Poinsettia Petals (flower, berries and sentiment). For the berries I used Pearlized Enamel Affects in Basic White. The scalloped edge is from Color and Contour...one of my favourite set of dies.


Here is another card made with the Fitting Florets DSP.
It's not your typical Christmas card but the flowers remind me of a Christmas rose.


Thanks for stopping by. Until next time....

Paula


Thursday, October 20, 2022

Harvey

Hello, I'm back again with a cutie patootie card. I fell in love with this die set from Tim Holtz/Sizzix. His name is Harvey. Isn't he just the cutest? The die set is a Colorize thinlit. That means there are multiple layers to each image. 


This particular image has 17 layers, but so worth the effort. Each die has a code on the back to make layering easy. 

As you can see, there are different versions of Harvey. Mix and match, change the colours, the options are many. 

Get yours soon, I think Harvey will sell out fast. 


Thanks for stopping by. Until next time....

Paula


Tuesday, October 18, 2022

Framed Florets

 Hello,

Excuse my absence. I have had a serious case of mental block. For the life of me I could not make a card. Everything I tried to make looked horrible. I couldn't choose a dsp, die or stamp set to work with. Does that ever happen to you? What do you do to break out of your slump? 

I've been watching You Tube videos and surfing Pinterest for ideas. One crafter in particular, Lisa Curcio, has great ideas. Today's card is definitely a winner design from Lisa. It's a fun fold. Easy to make. You can watch her instructions here.

The Framed Florets and matching dsp are gorgeous. 


Some of the dies cut out the images in the dsp...love that, it gives more options.
I'm not one to add too many embellishments to a card. I find they do not go through the post very well.  I did add the Pearlized Enamel in Basic White to the berries. (Note to self * add the pearlized enamel after die cutting, not before. The kind of got squashed.) The sentiment is from Cottage Rose stamp set. 


Here's the fun fold recipe:

BASE: • Balmy Blue: 5 1/2" x 8” 
 Score at 1 1/2", 2 3/4", 5 1/4", 6 1/2" 
Designer Series Paper: 1” x 5 1/4", cut 2 
Designer Series Paper: 1 1/4" x 5 1/4" 
FRONT PANEL: • Balmy Blue: 3 1/2" x 5 1/2" 
Designer Series Paper : 3 1/4" x 5 1/2" 
Fitting Florets Dies for the frame. Flowers were die cut and coloured with Stampin' Blends (Balmy Blue and Soft Seafoam.)
INSIDE PANEL: Basic White: 2 1/4" x 5 1/4" 

Here is another card in pink.. The flowers are cut from the dsp this time. 


Thanks for stopping by. Until next time....

Paula


Wednesday, September 14, 2022

A selection

 Hello,

Pardon my absence. It has been a challenging month and a half. Son injured...cat sick...sadness in the news. It has been difficult to focus on making cards.

Today, my post is a selection of cards I have made over the past few weeks.


All autumn themed cards because that's where my head is right now.

Thanks for stopping by. Until next time...

Paula


Sunday, August 21, 2022

Designer Series Paper

 Hello,

Stampin' Up makes beautiful designer series paper, so why not let that paper do the work for you. When you're stuck for ideas, lost your mojo or don't know where to start, pick up a sheet of DSP then coordinate your card stock with it. 


For today's card I used the Lovely In Linen DSP for the focal point of the card. I chose Night of Navy, Sweet Sorbet and Pale Papaya to coordinate with the DSP. 


These cards would be great in a gift set with a matching box. 

Don't stash your DSP away....use it... as a focal point on a card...envelope liners...envelope flaps. 

Thanks for stopping by. Until next time.

Paula


Tuesday, August 2, 2022

Sending Smiles Fun Fold

 Hello,

I've got an easy to make fun fold card for today. Sometimes I am overwhelmed with the techniques, papers, stamps and card making ideas that I get stalled. When this happens I either look at Pinterest for ideas or just go back to cards I've already made and change things up a bit. That's what I did for this card. I made this fun fold ages ago. 


It really is easy to make. Pick two colours of card stock and some coordinating DSP.  
For this card I used Daffodil Delight and Orchid Oasis. 

Here is the recipe:
Daffodil Delight card stock: measuring 4 -1/4" x 11", score at 5-1/2" and 2- 3/4"
DSP measuring 2- 5/8" x 4-1/8" and another piece at 4- 1/8" x 5- 3/8"
Orchid Oasis card stock: measuring 9" x 3- 3/4", scored at 3' and 6"
White card stock for image and sentiment: 2- 7/8" x 3- 5/8"

The easiest way to adhere the two pieces together is to fold both pieces then slide the smaller piece in between the larger piece making sure the smaller piece is centered.  Decorate the front of the card with your stamp set and VIOLA! your card is done. 

I hope you give it a try.


Thanks for stopping by. Until next time....

Paula


Tuesday, July 26, 2022

Happy Forest Friends

 Hello fellow stampers!

I have a fun fold card for you today. I saw this card on Pinterest but for the life of me cannot remember the maker...that will teach me not to Pin It!

It is an easy card to make. 


Now the inside fun fold...


The recipe:
Base in Sahara Sand- 5-1/2" x 4-1/4"
Mossy Meadow layer-  5-3/8" x 4-1/8".
DSP measures 5-1/4" x 4". 
Adhere the layer to the base.

Inside: 
DSP- 5-1/4" x 4".  
Mossy Meadow strip- 8" scored at 1-7/8", 4" and 6-1/8".

The panels:
Mossy Meadow layer- 4-1/8" x 1-5/8"
DSP layer: 4" x 1-1/2"

Adhere the DSP to the base, then add the strip ensuring the middle score line on the strip aligns with the score line of the base. Only glue down the ends of the strip to the base leaving the middle to be free and "pop up". (as in the picture above)

Add the panels to the strip in between the score lines. Then add your sentiments and front decoration.  For this card the sentiments are from the Pretty Pumpkin stamp set and the leaves are from the Gorgeous Leaves set. The layered panels for the front are cut from the Stitched Rectangles dies. 


I hope you give this fun fold a try. Thanks for stopping by.

Until next time....

Paula


Sunday, July 17, 2022

Rings of Love

 Hello,

Not that I am wishing summer away, but it's never to early to begin cards for an upcoming season. That way there is no rush to get them done. 

For today's cards I am using the Rings of Love DSP, found in the Sale A Bration brochure. It can be yours free  with  a $60 purchase. 

The papers are so pretty, very autumnal. 

The Fond of Autumn stamp and die set pairs well with the Rings of Love DSP. 


And here, another design from the same paper pack paired with the Stitched Greenery die. 


Hmm, I'm thinking I should get another pack of the Rings of Love Designer Series Paper. 

Thanks for stopping by. Until next time.


Paula


Sunday, July 10, 2022

Abigail Rose

 Hello,

I am obsessed with floral stamps. Most of my stash is a floral of some sort. So, when I saw the Abigail Rose suite in the catalogue I knew it was a must have. 


Not only are there dies to cut out the stamped images but the Designer Series Paper is gorgeous! I love the muted tones.


One particular sheet of DSP has groups of flowers to colour and fussy cut out to make lovely cards. 

Truly a beautiful focal point on a card. I kept the sentiment small, not to cover up the image. The checked background dsp goes with almost any image. 
Blends Colours used: 
Mint Macaron
Pale Papaya
Pineapple Punch

Thanks for stopping by. Until next time....

Paula


Saturday, July 2, 2022

Easy Cards

Hello,

Ever need an easy peasy card? Why not start with a ready made base. Like free stuff? With a purchase of $60 the Pool Party & Soft Seafoam Cards and Envelopes, are free. 


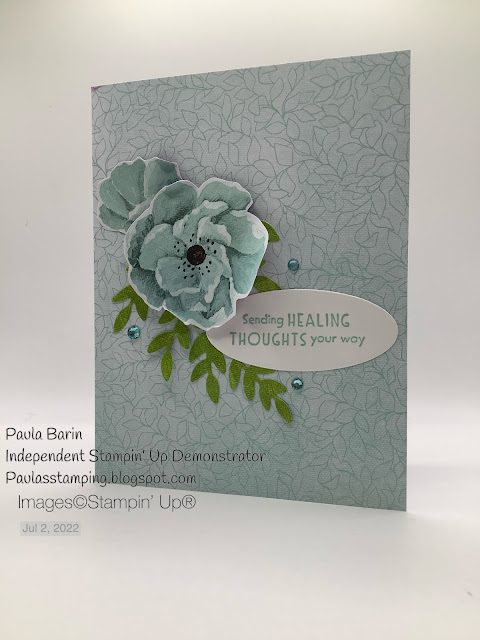
For today's card I added fussy cut Hues of Happiness flowers, paired it with a die cut from Forever Fern and added a sentiment. 


Sale-a-Bration runs now through to August 31, 2022. Take advantage of the promotion. 

Thanks for stopping by.

Until next time.

Paula